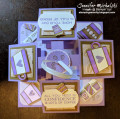
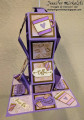
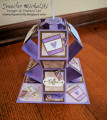
My counselor's birthday is coming up soon, and I wanted to make her a special card. I saw this tutorial that Sam Calcott at Mixed Up Craft did, and thought it would be fun to make.
I began by cutting the card bases (there are 2 glued together to make the accordion fold), center panel, and the patterned paper pieces & mats for inside the card, following the tutorial. I used 3 of the "Rounded Rectangles" to die cut the inside windows in the card bases and the inside mats & layers, and also to die cut the frames for the windows. I assembled everything as per the instructions.
I die cut the happy birthday from a scrap of the same cardstock I'd used for the card base. I backed the cardstock with Stick It adhesive first, to make the words easier to adhere. I adhered them to a panel of peach cardstock, which I matted with mint before adhering it to the center panel for my card.
I found a greeting in an old book of sentiments & quotes for cards. I opened a blank "canvas" in Photoshop the size of my peach sentiment panel, typed the greeting, and formatted it to fit. Then I printed it onto my panel. I matted that & adhered it to the center piece.
I cut 2 small panels of the butterfly patterned paper to go on the front of the card. I matted them with the peach cardstock, and adhered them to a mint panel. I heat embossed the greeting onto a scrap of blue cardstock, cut it into a banner shape, and adhered it to my card front.
At first, I was going to fussy cut butterflies from the patterned paper scraps to use as embellishments. But I didn't like the idea of cutting off the antennae, & didn't feel like trying to cut around them. So I found an old Hero Arts stamp & die set in my stash to use instead. I thought the vintage look of the butterflies went well with the patterned paper I'd used. I stamped one large & 4 medium ones onto scraps of smooth bristol paper, and colored them with my markers. (I chose marker colors based on ones in the patterned paper. I also inked each butterfly with Antique Linen Distress ink before coloring, to blend them in better with the muted colors in the patterned paper.) Finally, I die cut them & glued the smaller ones to the center panel inside the card. I popped up the large one above the greeting. I did add a panel to the back of the card, so I could write a personal message, and decorated it with 3 small butterflies that I'd stamped, colored, & die cut. While I wish I could deliver this card to my counselor in person, I know she will treasure it anyway. I look forward to getting to chat with her on my next phone session after she sees it!
Date: Sunday, November 1, 2020 GMT Views: 425
Favorited:3
Registered: November 24, 2013 Location: NYC Posts: 17736
Mon, Nov 02, 2020 @ 8:05 AM
I LOVE this!!! I pinned it for inspiration.
Clever you on the die cut butterflies-I would have sworn you had taken them out the paper your colors are so right on!
She will love it! That's a keeper !
------------------------------ Margot
I am a proud fan club member
Registered: February 3, 2005 Location: Delray Beach, FL Posts: 34769
Tue, Nov 03, 2020 @ 11:17 AM
Andrea, I agree with wavejumper. I absolutely love this card and know that your counselor will love it. What an amazing card with such great DP and overall design. You totally rock! Hugs and love! xoxo
------------------------------ Cheryl
Proverbs 3:5-6 My blog