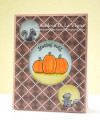
I thought it would be fun to have the 2 squirrels from "Pick of the Patch" in each of the smaller circles, "looking" at the group of pumpkins in the middle. After I die cut the circles in a piece of "Knit Picky Fall" paper that I'd cut to 4x5-1/4", I lined it up over a piece of bristol paper cut to the same size. I traced the circle openings onto the bristol, so I would know where to stamp my images.
I stamped the squirrels first, & then stamped the pumpkins, masking the middle one when I stamped the right & left ones. Finally, I masked all the images, as well as the ground area in the middle circle, & inked the sky with Speckled Egg. I placed a mask for the sky, and inked the grass with Shabby Shutters. I removed all the masks, & colored my images with water-based markers.
I used a "Sending Hugs" greeting stamp that I'd gotten as a freebie with an order from Lawn Fawn. The stamp is straight, but I was able to curve it on my MISTI tool to match the curve of the larger circle window.
I chose a tan cardstock for the mat on my card, & adhered that to a white A2-sized card base. I cut down the bristol panel slightly, just so the edges wouldn't peek out from behind the patterned paper. I added double-sided tape to the back of the bristol panel, and removed the liner paper only part of the way.
To position my bristol & patterned paper layers in the center of my tan mat, I taped the bristol to the back of my patterned paper with 2 pieces of painter's tape. I made sure the tape didn't attach to the double-sided adhesive I'd put on the bristol. I positioned the panels on my card, & when they were placed correctly, I pressed down where the double-sided tape adhesive was exposed. I carefully removed the painter's tape, removed the rest of the liner paper from the double-sided tape, & adhered the bristol panel completely. I added LOTS of foam tape to the back of my patterned paper, & adhered that in place over the bristol layer.
Date: Sunday, October 4, 2020 GMT Views: 236
Favorited:2