I created a background on a panel of cheap photo paper, using Distress Oxide inks & ink smooshing. I applied the inks to my non-stick craft mat, spritzed each with water, and dipped my photo paper into the puddles/drops. After each go-around of that, I dried the ink with my heat tool. After I'd covered the panel with as much color as I wanted, I used a wet baby wipe to wipe the surface of the paper. This magically takes away the chalky finish, and reveals all the colors in their magnificent glory. And, once I did that--I hated it. :(
After the work I'd put in, though, and the ink & paper I'd used, I didn't want to chuck the panel. I had originally planned this for a holiday card, and it just didn't work. So, I just set it aside for another card.
I finally decided that, while I didn't like the whole background, it might look good in smaller bits. (This is a tip I got from Jennifer McGuire.) So I got my "Frame in Frame" die set, taped the frames together so I could cut everything with one pass through my die cutting machine, and die cut the panel. Rather than one panel that I didn't like, I now had four frames that showed promise.
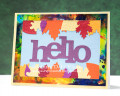
I decided to make Fall cards for Send a Smile 4 Kids. For this first card, I die cut several leaves & the hello from various colors of cardstock scraps. I glued the hello to the middle of a panel of blue cardstock, and arranged my leaves above and below. Once I got an arrangement I liked, I glued each leaf in place. I trimmed that panel down so it was just a hair larger than the opening in my largest frame die cut, to make sure there would be no gap between the frame & panel, and adhered it to a white card base. I adhered my frame in place, easing it into place so it snugged around the center panel. I absolutely love how this card came out, & I'm glad I didn't toss the original background panel!
Date: Tuesday, September 15, 2020 GMT Views: 328
Favorited:2