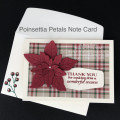
I began by die cutting the "Blooming Poinsettia" pieces from watercolor paper. I decided to color them by ink smooshing. I used Festive Berries Distress ink for the first layer. I dried them with my heat tool (no good reason--I just wanted to move along more quickly), & used Aged Mahogany Distress ink for a second go-around to add darker color. I dried them again, and then glued them together by applying glue to the flower centers and stacking the layers.
I chose a berry branch from the "Holiday Greens, Mini" die set. I die cut 2 branches from Strathmore Smooth Bristol paper, and colored them with my Tombow markers. Even though I knew I would use red Stickles to go on the berries, I went ahead & colored them red, to be sure no white would show through the glitter.
To border my background (yes, I have "white space" issues), I cut 2 strips from a red foil paper. I ran them through my die cutting machine with 1 of the "Stitching Lines" dies. I adhered those to the top & bottom of my card front panel.
I used liquid glue to stick down my poinsettia & sprigs. I pulled my greeting from "Vintage Christmas Post" set and stamped it in Ruby Red shimmer ink onto a scrap of white cardstock. I cut that into a banner, and adhered it to my card front. Finally, I mounted my finished panel to a white card base, and added Stickles to the berries.
Date: Friday, September 11, 2020 GMT Views: 143
Favorited:2