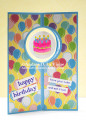
I created this card for a friend's birthday. I got the inspiration from the Free Standing Spinner Cards tutorial by Sam Calcott at Mixed Up Craft.
I began by making the card base. I cut 4 panels of blue cardstock to 5x7", & 8 pieces of 4 different patterned papers to 2-1/4x6-3/4". Then I adhered the patterned papers to the panels, leaving a 1/8" margin on all sides of each patterned paper piece. I die cut a circle out of one panel for the spinner mechanism to go in. I lined that panel up with the second panel, & used the first as a guide for placing my circle die, then die cut the second. I repeated this for the remaining two panels. I also die cut 4 rings to go around the die cut openings, by using the same circle die & the next larger one, from the same blue cardstock. Finally, I stamped my cakes (the one with the blown out candles is on the other side of the spinner) on 2 scraps of bristol paper, & die cut them with a smaller circle die.
I colored the cakes with my Tombow markers. I used strong double-sided tape to adhere a doubled-up piece of fishing line to the back of one of those circles. I glued the other circle to the back of the first, sandwiching the fishing line in between.
I used the same double-sided tape to adhere the fishing line to the back of one of my panels, along the score line I'd made down the middle. I borrowed a trick I'd seen Jennifer McGuire do to keep the fishing line from pulling out. After taping the line in place above the aperture, I folded the end over the tape, and used another piece of tape over that. I repeated the process for the other end of the line below the aperture, & trimmed off the extra length.
I used liquid glue to adhere all the panels together. I dry fit them first, using mini binder clips to hold everything together. I ended up having to do a bit of adjusting & trimming of the edges of the panels, because the circle openings (despite my best efforts) did not line up perfectly. I finally got it, though!
I stamped one of the happy birthdays from "Birthday Builder" onto white cardstock using Deep Purple ink, which matched the purple balloons in the one patterned paper pretty well. I stamped the first part of the other greeting (from "Birthday Before 'n Afters") onto white cardstock, using a piece of painter's tape to mask off the second part. Then I cleaned my stamp, masked the first part, inked the greeting & removed the tape, & stamped the second part. I cut all the greeting pieces into labels, & glued them to the card front. Despite a few hassles along the way, I really love how this card came out, and our friend was equally impressed!
Date: Sunday, July 26, 2020 GMT Views: 212
Favorited:2