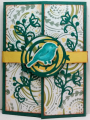
A friend of ours asked me to make a card she & her brother can give their parents for their upcoming 30th anniversary. Her mother (also a friend) is blind, so I always try to include as many tactile elements as possible for her cards. I also included Braille on the front label, that spells, "Happy Thirtieth Anniversary." The Braille doesn't show up well in the photo, but you can kind of see it over the flower. There is also a printed sentiment on the inside that her father can read.
I got the inspiration for my card from this one I found on Pinterest. I have the same Spellbinders dies the woman who made that one used, and loved the fanciness of it. It turned out to be quite involved! I'm not sure what the size of that card is, but it must be taller than 6" (the height I made mine), because the label & frame on mine took up almost the entire height of the card. I had intended to add a smaller label to one of the panels on the front with the date, as in the inspiration card, but ended up having no room.
I created a gatefold card base first. Because I was making it 7" wide, I had to get a bit creative, since I don't have 14"-wide cardstock (the full width I needed for the card base). I cut 2 panels for the front to 3-1/2" wide, then shaved off just a hair from one long side of each so they would meet nicely in the middle. For the back panel, I cut a piece of cardstock 8" wide, and scored 1/2" from each end. I folded along the score lines, added adhesive, and adhered my front panels to those flaps. I put the flaps on the outside of the panels, then cut 2 more pieces of white cardstock to add to the panels, to hide the flaps. I know that's probably a bit much, since I could have just had the flaps on the inside of the card. I just prefer a neater appearance, hence the extra step. It also helped reinforce the front flaps a bit more.
I cut 2 panels of white cardstock to 3x5-1/2", spritzed them lightly with water, and then embossed them with the "Damask" folder. I let them dry, adhered them to Evergreen mats, & adhered those to my card front panels.
I die cut a piece of green cardstock with the largest of the "Labels Twenty-Five" dies. I lined up the corresponding "Majestic Labels Twenty-Five" die, and cut that. Since that die only cuts the details, but not the edges, I then die cut the center out with the next size down "Labels Twenty-Five" die. To provide more stability, I die cut some vellum with the larger "Labels Twenty-Five" die I'd used, and adhered the frame to that with spray adhesive. Note--I didn't cut the center from the vellum, which will come back to bite me.
For the focal panel, I die cut a label from green cardstock, and another from white. I fussy cut the border from the white one, so when I layered it onto the green, I'd have a mat. I stamped the flower in the center of the panel with Soft Granite ink. I flipped the panel over, and marked the dots for the Braille greeting in pencil. I placed that face-down on a foam mat, and used a small ball stylus to create the Braille dots. I did have to start over on that, because on my first, a few letters in, I managed to punch right through the cardstock, and couldn't repair it. :( (At least it wasn't on the last letter!) So the second time, I was ultra-careful with how much pressure I used! Finally, I adhered it to my mat with double-sided tape, and a little glue around the perimeter of the label.
I lined up the vellum-backed frame on my card, and glued just around the edge on the half that overlapped the left panel of my card. I then went to glue the inner label to the other side. That's when I noticed the problem I'd created with the vellum backing. I couldn't close the card, since the vellum in the center was in the way of the focal label, & wouldn't allow the frame & label to interlock. :( So I carefully peeled the frame off the card front (thank heavens it didn't tear the card front panel irreparably!), and used my scissors to cut the center of the vellum away. There was no way I was going to try to recut the frame at that point! Thankfully, I was able to trim the center out without messing things up. At the very least, the vellum behind just the frame did give it the added stability I wanted. Then I re-glued it to the card front, glued the inner label to the right of the card, and that finished that!
I printed a sentiment that I found online on a panel of white cardstock, matted that with green, and adhered it to the inside of my card. Even with all the trials & tribulations ;), I still really like how this came out! I hope the recipients will enjoy it as well.
Date: Sunday, June 7, 2020 GMT Views: 449
Favorited:3