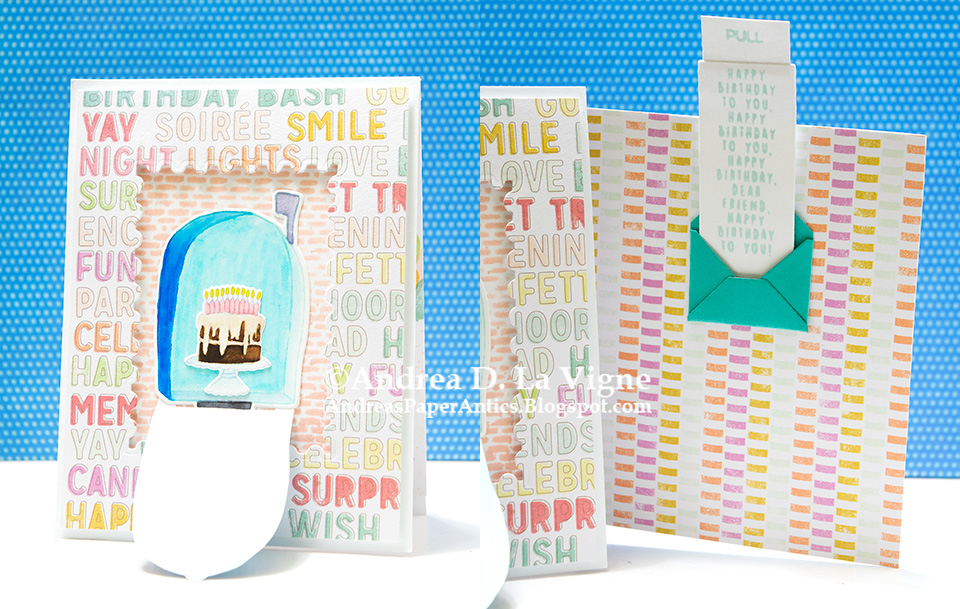
I thought the Side Flap Trifold card was a fascinating design, and couldn't wait to try it. A friend of ours has a birthday coming up soon, so I thought this would be the perfect opportunity.
I stamped the mailbox components onto a scrap of smooth bristol paper with Kiddie Pool ink. I also stamped the cake on bristol with Moonstone ink. I colored all the images with my Tombow markers, using a damp paintbrush to blend & add shading.
I decided the "Postage Stamps" die set would go right along with the "mail" theme. I cut a piece of patterned paper down to A2 size, and die cut the window in the center. (I later went back & trimmed 1/8" off each side of the panel, so I would have a mat around it.)
I didn't want to have my mailbox on just a plain white background. I also didn't want patterned paper or another color to compete with it. So, inspired by one of Nichol Spohr's recent videos, I decided to stencil a brick pattern with Tea dye ink onto my white card base. Since I wanted a border around my main panel, I masked off the edges with yellow Frog tape. After stenciling, I removed the tape, but it peeled the cardstock in 2 places. :( Since I didn't want to waste my card base (which I'd cut following the tutorial directions), & certainly didn't want to start over, I cut a frame from an A2 size panel of white cardstock & adhered that to the front of my card base. That covered the peeled bits, and still let the stenciling show through--problem solved!
For the side flap, I covered the front with another of the patterned papers in the "Birthday Bash" pad. I wanted an additional interactive element on the back, that would show when the card was open. So I used the envelope die from the "Mail Box" die set to cut an envelope from teal cardstock. I also used the slit die to cut from the middle of that piece, keeping it where it wouldn't show when the envelope was assembled. I lined up the envelope on my patterned paper panel, and traced where the slit needed to go with a pencil. Then I die cut the slit from that piece. I triple-stamped the "happy birthday" song sentiment from "Mail Drop" in Kiddie Pool ink on a scrap of white cardstock, and die cut it with the pull-strip die from the "Mail Drop" set. I also cut another small piece of white & stamped the "PULL" from "Interactive Labels" on that, then glued it to the pull-strip piece.
I glued the envelope to the patterned paper, lining up the slits, & then adhered the envelope flaps. I fed the pull-strip piece through the slit from the back, & up through the envelope. I added double-sided tape to the back of my panel, putting 2 pieces alongside the pull-strip (but not too close) to make a track, and another piece below the bottom edge as a stopper. Then I adhered that panel to the side flap of my card base.
I mounted the front panel to my card with foam tape, and glued the assembled mailbox in the center of the window. I glued the cake inside the box, & that finished this rather involved card. I think it was so worth it in the end, though, & I'm sure our friend will treasure it!
Date: Sunday, May 31, 2020 GMT Views: 615
Favorited:3