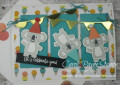
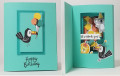
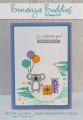
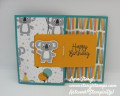
I took advantage of something new Stampin' Up! (SU) is doing now... they coordinate their Designer Series Papers (DSP) with the dies that go with their stamp sets. This means you can use the dies to cut out your stamped images, or from the pattern papers! I just love SU's "Bonanza Buddies" suite with it's toucan, koala and lion buddies. All three Paper Player's required colors were in the pattern paper, so I decided to make the card mechanism itself out of SU Bermuda Bay and Coastal Cabana cardstock... did I tell you one of my all-time favorite colors is aqua!!! What a perfect color challenge for me!
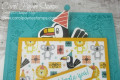
I knew I wanted to make a "tunnel card" like I'd seen in this week's SCS Technique Lover's Challenge, and with the tutorial link they provided to Jennifer McQuire's tutorial (https://www.jennifermcguireink.com/2...el-cards.html), I just had to try it! It also met the Always Fun Challenge of "fun folds", so I'd hit the jackpot!!!
I won't duplicate the instructions here since Jennifer covers them so well. But her measurements are a bit tricky, since they are audio only, and I had to go back and listen to them a couple times. To save YOU time, I'm listing them here:
Three pieces of cardstock:
1. 5-1/2"x 8-1/2" scored at 1/2" and 4-1/4"
2. 5-1/2"x 8-1/2" scored at 4-1/4" and
1/2" cut off one end
3. 5-1/2"x 4-1/4" with a smidgen cut off
one long side and one short side, then
scored along both long sides 1/4"
Using these dimensions, it's easy to follow the tutorial and construct the card. To give my tunnel card a sense of more depth, I used the lighter SU Coastal Cabana for pieces #1 & #2, and the darker Bermuda Bay cardstock for piece #3.
Rather than stamp the inside of the tunnel as Jennifer did, I instead used the party balloon pattern paper to complement the balloon figure on the front of the card. Both sentiments are from the coordinating "Bonanza Buddies" stamp set.
All the squares on the inside and outside of the card were die cut with SU "Rectangle Stitched" framelits dies. The lighter aqua rectangle on the front of the card is backed by a piece of craft foam that I die cut using the same die in order to add dimension to the front by raising the lighter panel off the card surface.
I am rating the difficulty level for this card as a "4" out of a possible "5". No particular step is difficult, but the measurements must be exact, as must be the card assembly in order for it to work.
Date: Monday, March 9, 2020 GMT Views: 1447
Favorited:7
Splitcoast Dirty Dozen Swapper of the Month November 2012
Registered: December 29, 2004 Location: Madtown Wi Posts: 19422
Mon, Mar 09, 2020 @ 3:53 PM
Wow! This card is a stunner. Love the bright colors and the whimsical animals...so festive. Thanks also for posting the dimensions. My attempt at this challenge wasn’t as successful as yours.