I have also used the colours for this week although they aren't as discernible as you would expect because of how I used them.
Anita aka snietje also inspired me but what I did was not really the tehnique. It can be found here; TLC783 ~Move the Colors~ {02/24/2020} by snietje at Splitcoaststampers
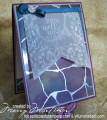
I took a heavy duty sheet protector and cut the sided open leaving only the bottom seam closed then dropped the three different inks onto the sheet closed it up and squished the inks around. I tried it with normal blending paper and again with gloss paper. I went with the gloss paper which gave me a much more muted colour effect.
Next I drew some lines with a pencil and then went over these lines with a embossing ink pen and covered these lines with silver embossing powder.
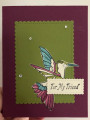
I used a brand new 3D folder to dry emboss some vellum also using an embossing folder spacer to leave an un-embossed area in the middle for the greeting. When using the embossing folder and the spacer you have to play with the sandwich. I have a Big Shot and I found the best result was to use the platform with all teh tabs closed then put the folder on with the vellum inside and teh spacer ontop then I just kept adding shim layers until I got a good result. My shim is just the back packing card from embossing folders and it works perfectly, I needed four layers for this embossing.
The rest is obvious, I used Ranger Wonder tape 1/4" to attache the vellum and then the ribbon ribbon. I used SU Mini Glue Dots to attach the rhinestone brad and I used X-Press It High Tack double sided tape to put everything together.....and that's it folks.
Thank you for looking and don't forget VSN Mini is on found here; Forums at Splitcoaststampers
Date: Friday, February 28, 2020 GMT Views: 528
Favorited:4
Paper: Gloss Paper - White. SU A4 218 gsm card stock - Smoky Slate & Rich Razzleberry. Vellum
Paper Size: Base = 11 cm x 15 cm
Ink: SU Pigment Ink - Whisper White. SU water based dye re-inkers - Island Indigo (subbing for Pretty Peacock) Rich Razzleberry & Old Olive. Versa Mark - Watermark.
Accessories: Heavey Wight protector sheet. Versa Mark Watermark pen. Embossing Powder - Silver. SU embossing Folder - Parisian Flourish 3D. SU rhinestone - Game Spinners. SU 1/4 " satin ribbon - Island Indigo. Crop Stop Embossing Folder Spacer - rectangle.
Registered: November 7, 2006 Location: Willamette Valley Oregon Posts: 34503
Sat, Feb 29, 2020 @ 9:46 AM
Total gorgeous~ness! The narrow strip of your main panel peaking around on the inside is a nice finishing touch. Thank you for the step by step design process, Marg!
------------------------------ Susan~~~One4Joydaily I'm a FAN CLUB member, U? MY GALLERYof visual Delights MY BLOG
Splitcoast Dirty Dozen Alumni SCS Gallery Moderator Splitcoast Challenge Hostess Teapot Tuesday TEAm
Registered: July 27, 2007 Location: Dublin, Ireland Posts: 131774
Sat, Feb 29, 2020 @ 10:37 AM
Ack. Third time of writing this comment...love the look of your embossed vellum, and thanks for the tips on using the spacer. Love your blue background. Sounds pretty much link the ink, spray, smash technique to me. I always seem to find a page protector cut open and with dried-up ink in it whenever I tidy my desk.
Registered: January 8, 2011 Location: Sydney, Australia Posts: 40385
Sat, Feb 29, 2020 @ 4:18 PM
Such a beautiful card, Marg, the colours on the glossy card look wonderful using this technique and I love the embossed vellum overlay with the sentiment! The ribbon at the top the perfect finish, too!
------------------------------ Sue
Fan Club Member QFTD143 FS420