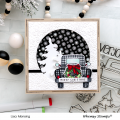
One of our traditions when I was younger was cutting our own Christmas tree at a tree farm. While we never brought it home in a pickup, we would use our van, which was most recently a dark grey/black color. I don't have a van stamp, but I colored the truck to mimic our van.
I stamped the truck in Morning Mist ink onto smooth bristol paper. I die cut that with the coordinating die, & also die cut the tree with its die from the "Truck Tidings" set. To color the tree, I first did a pretty solid base layer in a mid-green Tombow marker. Then I went in with 2 darker markers and made flicks for the pine needles. I added more shading on the right side, since I knew that would be pointing down when I put the tree "in" the bed of the truck. I used grey markers to color the truck, blending the colors with a damp paintbrush to add shadows & highlights. I also used a light blue marker to color the windows in the truck.
Because we live in East Texas, it basically never snows at Christmas. In the 41 years we've lived here, we only ever had one white Christmas--and that was only on Christmas Day itself. So we never brought home a tree in the snow. To emulate that effect, I die cut a grassy border from watercolor paper, and inked it with Shabby Shutters.
I cut a panel of Icy Mint cardstock, and inked around the top & edges with Broken China, just to provide some variation. I trimmed a strip of black cardstock for the road, & adhered it to my panel, so I could use it as a guide for where to stamp my distant trees. I stamped those in Olive Grove ink, using second-generation stamping for a couple of impressions to add a sense of depth. I then glued my grass on, & glued down my truck & tree.
I hadn't been sure going into this what I would do about a greeting. After I finished putting the card front together, I thought it would be neat to have a thin greeting in white below the truck, to mimic the stripe on a road. So I got the Merry Christmas greeting from "Vintage Christmas Post." Using my MISTI, I stamped it first centered side-to-side with Versamark ink. I sprinkled on white embossing powder so I could see where the stamping was. I shifted the panel in my MISTI to stamp the same text on either side of the first. I added the rest of the embossing powder & heat set it. I know that the truck is technically on the wrong side of the road for driving in Texas (though you might be surprised how often it happens! LOL). But my explanation is that it is passing another slower vehicle. When everything was together, I adhered my panel to a white card base.
Date: Thursday, November 14, 2019 GMT Views: 1355
Favorited:3
Accessories: "Truck Tidings" coordinating dies; My Favorite Things "Grassy Fields" die; Ranger White Super Fine Detail embossing powder; Tombow markers
Registered: August 15, 2007 Location: Twin Cities MN Posts: 50462
Thu, Nov 14, 2019 @ 12:50 PM
I love this...it's great how you kept it a green Christmas since that's what you've experienced (by the way cutting it down with snow on the ground is colder and gets snow in your boots or mittens as you get down on the ground). Your coloring especially on the truck is superb. Thanks for sharing your holiday tradition.
Splitcoast Dirty Dozen Creative Crew SU Design Team Alumni
Registered: November 19, 2005 Location: Florida Posts: 7863
Fri, Nov 15, 2019 @ 3:34 AM
How fun! I like the "line" in the road and how you created the background to match what your Christmas looks like. (I've lived in the SE my entire life so white at Christmas isn't usually what I see, either.) TFS
Splitcoast Dirty Dozen Splitcoast Challenge Hostess Teapot Tuesday TEAm
Registered: January 19, 2014 Location: Central Indiana Posts: 90075
Fri, Nov 15, 2019 @ 10:01 AM
My MIL use to own a tree farm but she has sold it to her niece who runs it. We use to go there every other Christmas to spend time with my husbands grandparents. I sure miss those days. Wonderful card and stunning coloring. Thank you for the memory.