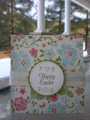
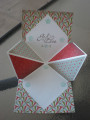
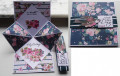
I cut the card base, patterned paper layers, & mats following the tutorial measurements. I scored the base, & cut 2 slits for the pop-out part in the middle. I adhered all my patterned paper pieces to their respective mats, then added them to the card base.
I die cut the topper from one of the purple papers from the "Flip/Side" pad with the "Fascination" dies. I folded the detail pieces the die creates, and tucked them under the adjoining sections. I also die cut another piece with just the outline die, to back the main die cut. This made it both sturdier & neater. After I glued the topper to the backing, I used liquid glue to adhere that to the center pop-up feature.
I stamped the greeting with Thistle ink onto a piece of white cardstock. I matted that with the same green cardstock I'd used throughout, & adhered it so the topper hides it with the card is closed. This was a super easy card to put together, thanks to Sam's excellent instructions!
Date: Thursday, October 10, 2019 GMT Views: 225
Favorited:2
Paper: Recollections "Petite Floral" 12x12" patterned paper pad; Neenah Rosa textured cardstock; Die Cuts with a View "Flip/Side" cardstock pad; pink, green, purple, white
Paper Size: A7
Ink: Ranger Thistle Archival ink
Accessories: Spellbinders "Fascination" Cut-Fold-Tuck dies
So pretty! You're quick -- just saw this video last night and wanted to try it. I love how you matted your patterned paper with the light green -- it really added a lot to the card. Your focal point is just lovely.