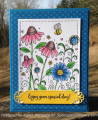
This card was made for a Try Stampin' on Tuesday sketch challenge whose optional theme was "Put Some Bling on It". I think I did the "bling" on every aspect of the card since even the cardstock was metallic or foil!!!
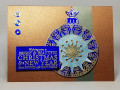
What makes this card possible is the gorgeous stamp from the now out of business Outlines Rubber Stamp Company. I think I bought this "Round Ornament" stamp in the end of the 1990's. What's so great about it is that you can stamp it multiple times on different cardstock, then cut out and layer the images to create 3D cards! I used Versamark ink, and coated the ink with fine gold embossing powder, then heat set each color. Note that it's a good idea to heat test your metallic cardstock before doing your stamping, since some will curl and may possibly ruin your image when heated.
I used three different colors of metallic cardstock for the ornament, which included royal blue, teal, and light bluish green. I used Versamark to stamp the image on each of the three shiny cardstocks, then used paper snips (or you can use a crafting knife for more precise precision) to cut out just part of the image on one piece, and an even smaller portion of the image on the third piece.
I then stacked the three atop one another using adhesive foam strips to raise each layer up from the one below. Then digging into my stash, I found two sizes of gold rhinestones to put on strategic points of each cutout. I advise cutting and assembly first, so that you don't waste rhinestones on parts of the images that will be hidden by the layer above.
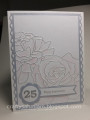
For the vertical strip in the sketch, I used the same bluish green metallic cardstock. The sentiment is from Stampin' Up! (SU) "Bright & Beautiful' stamp set.
For the sentiment, I used the same blue cardstock as in the ornament, and heat embossed using the same gold powder. Since the sketch requires the sentiment to overlap the ornament, I used adhesive foam strips on the left side of the blue panel to raise it up to the same level as the teal part of the ornament.
The three large gold rhinestones seemed lost when mounted directly on the metallic card base, so I used a small hole punch to punch circles from the scraps of blue cardstock, and used them as a "mat" for each rhinestone. This makes them stand out, and also helps pull them into the main color scheme.
I'll admit it takes a bit of time to do all the hand cutting of the ornament layers. I'd say I spent about an hour just creating the ornament itself. Consequently, I'm giving this project a difficulty rating of "4" out of a possible "5". It's not that any one step is hard to do,,, it's just that you need patience and accuracy to get it right.
I'm sure whomever I end up sending this to during the holidays will like it!
Date: Thursday, September 19, 2019 GMT Views: 355
Favorited:3