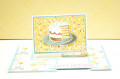
A good friend of ours is having a birthday soon. I made him this card, following a tutorial for an "Invisible Impossible Card" by Sam at Mixed Up Craft.
I created the card base from acetate, following a template I'd made previously from Sam's tutorial. (The acetate is what makes it an "invisible" impossible card, and makes it sturdier for the long haul to boot.) After I cut, scored, & folded the base, I cut my mats from Caribbean Breeze cardstock. I also cut the patterned paper pieces for the base, from the "Party Boy" pad. I was thankful I had more than 1 sheet of that pattern, though, because I cut one upside-down! Something to note, with an impossible card, is that if you have a directional pattern, you have to make the base pieces mirror images of each other. Thankfully, how you cut the other pieces for the pop-up don't matter, as long as you get the sizes right!
For the focal image, I used the cut-into cake from "Birthday Before 'n Afters." I stamped it with Desert Sand ink onto a scrap of vellum bristol paper, & colored it with my Prismacolor pencils. Finally, I die cut it with the coordinating die. I decided I needed something to "ground" my image, since it kind of got lost on the busy background pattern I'd chosen. So I used the 2 smallest WRMK "Oval" dies to make a plate. I die cut the larger from a scrap of silver mirror cardstock, then used the smallest die in the set to emboss the center. Very convincing, if I do say so myself! Then I used double-sided tape to adhere the cake to the plate. I popped both up on foam tape on my background.
I adhered all the cardstock & patterned paper pieces to my acetate base with a combination of double-sided tape and ATG adhesive. I cut 2 more pieces from white cardstock to the same shape & dimensions as the teal pieces on the base, to adhere to the bottom so my adhesive wouldn't show through the acetate.
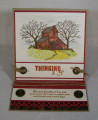
For the main greeting, I cut a strip of white cardstock, & stamped "Happy Birthday" from "Big Birthday Sentiments" in Ruby Red ink. That ink has a sparkle to it, which I figured worked well with a birthday card. I adhered that to a teal mat, leaving a 1/16" border on all sides. Finally, I used double sided tape, just at the ends of the strip, to adhere it to the base of the card. I also used Ruby Red ink to stamp a complementary sentiment on the back of the pop-up panel. You can see that at this post. This card was pretty easy to put together, aside from the hiccup with the patterned paper being upside-down on the bottom the first time around.
Date: Saturday, July 27, 2019 GMT Views: 214
Favorited:2