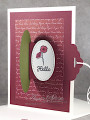
A former student of my mom's has a birthday coming up, so I made him this card. He likes cats, so the image was a no-brainer!
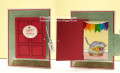
I began with the flip flap mechanism itself, figuring that would be the determining factor for measuring everything else. I made my main panel a little larger than in the tutorial--3-7/8x5-1/8". I also scored it horizontally, to create the look of siding. I cut the pull tab to the same dimensions as in the tutorial, though. I used a "Crescent Tag Toppers" die to die cut one end of the tab, and a 1/8" hole punch to punch the hole. It was a bit difficult figuring out how to adhere the one end of the tab. Because the tutorial photo had a red tab on a red background, it was hard for me to see exactly where the end stuck down. Thankfully, I finally figured out it goes on the front of the panel, not the back.
I next did my image panel. I cut a scrap of bristol paper, since I wanted to color with my Tombow markers. I stamped the image onto the panel with Versafine, & used a pen to draw in lines for the baseboard. After I masked the cat, basket, & lower part of the panel (from the top of the baseboard down), I used a makeup brush to blend on Squeezed Lemonade ink for the wall. I moved my tape mask to the bottom edge of the baseboard, & blended Victorian Velvet for the carpet. Then I removed the tape & mask & colored my image.
I die cut the banner from bristol, and cut the flag pieces off of the "string" part. I colored them with my markers in rainbow colors. I glued them across the top of the panel, & then glued down a bit of baker's twine along the top edge. I had to be extra careful, since I'd used water-based markers and the color would bleed if I got the glue on the ink. Thankfully, it only bled in a couple of spots, & not very visibly.
I cut my door from red cardstock, a little larger than my image panel. I didn't have a door stamp the right size, so I just penciled in the panel lines, then went over them with a black pen. I used a dark red Prismacolor pencil to add some shading to the panel edges, and a silver paint pen for the doorknob.
I cut a strip of the same teal patterned paper that I'd used for the panel, & inked it with Brushed Corduroy to create a step. I also cut another 1/8" wide strip and went over it a few times with Picket Fence Distress Stain to create a threshold (or the edge of a porch floor). After I adhered the door to the pull tab mechanism, I glued the step & threshold/floor edge below.
It bothered me a bit that I didn't have a logical place for a greeting, to make this obviously a birthday card. (No, the banner wasn't enough for me. LOL) I finally came up with the idea of a door sign. I stamped the "happy birthday" with Candied Apple onto a scrap of white cardstock. I die cut it with an oval die, and colored around the edge with a yellow marker. I added a brad through the sign for a "hanger." I die cut a piece of fun foam with the same oval die, and adhered it to the back of my sign with double-sided tape, & adhered that to the door. Greeting--check! I matted the panel with the same red cardstock I'd used for the door, and adhered that to a white card base. I die cut a small tag, stamped "pull" on it, and tied it with grey baker's twine through the hole in my pull tab. (Just to make it obvious to pull the tab!) And that completed this card. Despite the difficulties figuring out where to adhere the end of the pull tab, it was a pretty easy card to put together.
Date: Sunday, July 21, 2019 GMT Views: 947
Favorited:2
Accessories: Hero Arts "Nesting Oval Infinity," Sunny Studio "Crescent Tag Toppers," Taylored Expressions "Party Banner Border," Poppystamps "Pinpoint Main Street Tags" dies; Tombow markers; Fun foam