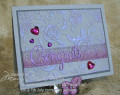
I actually CASE'd one of my own cards for this design. In that, I had cut cardstock squares & rounded the opposing corners before gluing them to my card front and putting my greeting on top. This time, I used the largest solid square from "Rounded Diamonds" to stamp.
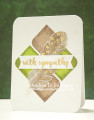
If I have even ever done the rock 'n' roll technique, it has been a long time since then! I did read through the tutorial here on Splitcoast, just to make sure I was doing things right. I began with my greens. After making reference marks lightly in pencil on my panel, I inked up my stamp with Lime Green, then went around the edges with Forest Glades. I used my Stamp-a-Ma-Jig to help with lining up the stamp, since I was going for precision. When I stamped the first impression, it was VERY splotchy, and I could tell it wouldn't smooth out enough in the end. Thankfully, I had left the Stamp-a-Ma-Jig handle in place. So I reinked my stamp with just the Lime Green, and stamped over my first impression. That helped. So, when I did the second green diamond, I stamped it first with just Lime Green, then inked up again with Lime Green & added the Forest Glades, and stamped again.
I repeated the process with Toffee Crunch & Cup o' Joe inks for the top & bottom diamonds. I again stamped with just the Toffee Crunch, reinked my stamp & did the rock 'n' roll technique, then stamped over the first impression.
By now the green inks had pretty much settled in--and either the darker green faded, or they blended together! Since I didn't want to start over, I chose a darker green ink (Olive Grove), & did the rock 'n' roll process with that & the Lime Green, stamping over my original diamonds. I thankfully had not wiped the ink off the imaging sheet for the Stamp-a-Ma-Jig, so I was able to line up my stamp using that pretty easily. This time I got enough contrast between the greens.
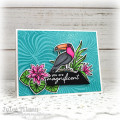
I stamped the base image for the feather in Coffee Archival ink onto a scrap of vellum. I heat set that, then treated it with my powder bag. I stamped the dot detail layer in Versamark, & heat embossed in gold. I die cut that, and laid it on my card to see how it looked. I felt it was still a little too transparent, so I die cut another feather from the same vellum, ran my stamped feather through my Xyron Sticker Maker, and adhered it to the unstamped die cut. I added small bits of liquid glue to the back of the feather, behind the embossing, and put it on my panel. I put a couple of acrylic blocks on top to hold it down while the glue dried, then worked on my greeting.
I stamped & heat embossed my greeting onto a scrap of white cardstock, then cut that into a fishtail banner. I adhered it over the feather. I mounted my panel to a white card base, & rounded all 4 corners with the 1/2" side of my Corner Chomper. All told, this card took almost the whole hour--in fact, I had only 49 seconds to spare! I don't usually do CAS designs, but I think this turned out pretty well, if I do say so myself! (And I think I just did say! LOL)
Date: Friday, July 12, 2019 GMT Views: 562
Favorited:4
Registered: June 4, 2009 Location: Deatsville, Alabama Posts: 83690
Sun, Jul 14, 2019 @ 7:10 AM
Very pretty! Hugz
------------------------------ Nancy Williams - Hope your day is Spirit-filled and ink-filled (in that order)!DRS Designs-DT, Punchkateerforever, Dirty Dozen Alumni