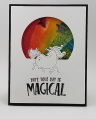
This card was made for my grand-daughter's birthday. All little girls love unicorns and rainbows! I was inspired by Jennifer McGuire's tutorial on direct-to-paper techniques (https://www.jennifermcguireink.com/2...iveaways.html).
Direct-to-paper is just what the name says, dragging your ink pad across a blank piece of paper. In my case, I use Stampin' Up! (SU) inks in the rainbow order (ROY-G-BIV) in an arch pivoting on the heel of my hand. I then spritzed the paper lightly and then dried it with a heat gun. Jennifer recommends watercolor paper, but I just used regular white cardstock, then after it was blown dry, I tucked it under a heavy book to flatten out while I worked on the rest of the card.
The front panel was created by first stamping the unicorn with black ink on a 4"x5-1/4" white cardstock positioned so that a circle die could be placed overlapping it to create a window for the rainbow to show through. Then, by placing the circle die on my Big Shot cutting plates so that the part I didn't want cut was hanging out from between the plates. A similar tutorial for this technique can be found at: Partial Die Cutting Tutorials at Splitcoaststampers
I then stamped the sentiment below the unicorn using Versamark ink, then coated it with black embossing powder, and heat set to a glossy finish. Be sure to using an anti-static dust before stamping to minimize any stray embossing powder sticking where you don't want it to show up.
Because I wanted this card to be a shaker card, I cut a piece of acetate from packaging material I had laying around, and used Scor-Tape to attach it to the back of the front panel so it completely covered the opening. I then used a piece of kids fun foam slightly smaller than my card front as my spacing layer behind the panel so I could create a shaker card. Using the same die, I cut a circle to fit exactly behind the partial circle, then glued it to the back using Tombow.
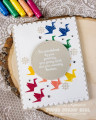
The rainbow colored panel was then trimmed to be slightly smaller than the card front so that the rainbow would be positioned to be visible through the acetate window of the card front. I placed several fantasy-type foil shapes in the center of the rainbow, then laid the foam-backed card front over it (having put score tape all around the back of the opening and all panel edges.
The final step was to mount the front panel assemblage to the card base. I chose a heavier black cardstock cut to 8-1/2"x 11", scored at 5-1/2" and folded. I used Tombow to attach the front.
I'm sure my grand-daughter will love the unicorn and rainbow card! I am rating the difficulty at "3" out of a possible "5" just because of the many steps, and the need to be precise when making your partial cut.
Date: Friday, May 24, 2019 GMT Views: 445
Favorited:4
Additional Info
Stamps: SU Magical Day
Paper: SU Whisper White Thick Cardstock, Basic Black
Paper Size: A2
Ink: SU Real Red, Tangerine Tango, Crushed Curry, Wild Wasabi, Pacific Point, Elegant Eggplant, Memento Tuxedo Black, Versamark
Accessories: SU Magical Mates Framelits Dies, Spellbinders Circle Die, Embossing Buddy, Artfully Scribed Black Detail Embossing Powder, Heat Tool, Xacto Knife, Craft Foam, Scor-Tape, Tombow Multi Liquid Glue
Techniques: Direct-to-Paper, Partial Die Cut, Heat Embossing