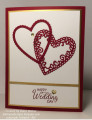
This bridge fold card was made as for my sister and her husband's anniversary. It fits in a standard A2 envelope, yet stands on its own for display. Personal sentiments can be written on the back.
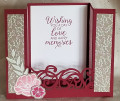
And another one by Rachel Tessman at: https://stampyourartout.com/2019/04/...fold-card.html Note that the dimensions in Rachel's written tutorial are for a different size than the one she demonstrates in her video. Both sizes work, but choose one or the other and stick to it.
The card base is Stampin' Up! (SU) Cherry Cobbler cardstock. The "laser-cut" bridge was extracted from an SVG digital cutter file from Jennifer Maker's free resource library at: https://jennifermaker.com/library/ Note that you will have to sign up with your email address for access to all the free SVG files. The one I downloaded from Jennifer's site, and modified using the Brother CanvasWorkSpace software that is free from Brother is called "Filagee Laser-Cut Invitation Set". I simply cut one of her designs in half and sized it to 4-1/2" long. You can easily use an edge die instead of a digital SVG file to create the brige, which is what both tutorials demonstrate.
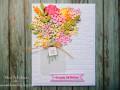
The sentiments are from the SU "Beautiful Bouquet" stamp set. The flowers at the left bottom front of the card were scanned and cut using my ScanNCut2 from SU "All My Love" Designer Series Paper. I set the machine to leave a 0.04" order around the two flowers and leaf stem. These were glued on with Tombow, and the small red flower was adhered using an adhesive foam strip to raise it up for added dimension.
I am rating the difficulty of this card as a "2" out of a possible "5". All the cuts are simple, and the folding of the card is very straightforward.
I think it makes a really nice anniversary card! Thanks to Rachel for the inspiration!!!
Date: Friday, April 12, 2019 GMT Views: 1362
Favorited:4