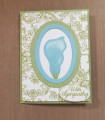
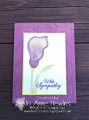
First adhere a 5 1/4 x 4 piece of Botanical Butterfly DSP to the Lemon Lime Twist Card Base. Using the 4th largest Layering Oval, cut a window in the front of the card.
Open the card and add a 5 1/4 x 4 piece of Whisper White Cardstock. Close the front of the card and lightly draw a circle in pencil around the inside of the oval so you have a guide to stamp your lily image.
Stamp the flower image with Gorgeous Grape Ink in the oval and then erase the oval. Stamp the stem and leaf images with Lemon Lime Twist Ink. I used a piece of scrap at the bottom to protect the card base from getting ink on when stamping the stem and leaves.
Using the largest scalloped oval and the 4th largest oval cut a piece of Lemon Lime Twist Cardstock. Lay the oval within the scalloped oval and cut together to create a scalloped layer.
Do the same with the 4th and 3rd largest ovals with Gorgeous Grape Cardstock to get the thin oval layer.
You will layer the grape oval over the green scalloped oval and then adhere them over the window. I used Liquid Glue to make sure they lined up correctly.
Stamp 3 small butterflies with Black Memento Ink on a Whisper White strip and punch out. Color the top wings with a Dark Highland Heather Stampinâ Blends Marker.
Stamp the sentiment on Whisper White and cut with smallest Layering Oval and then back it with a scrap of Gorgeous Grape cut from the smallest Scalloped Layering Oval. Adhere the sentiment and 3 butterflies to card.
Date: Thursday, March 28, 2019 GMT Views: 1617
Favorited:6
Registered: August 27, 2014 Location: Santa Rosa, Texas Posts: 12119
Thu, Mar 28, 2019 @ 3:24 PM
This is beautiful! Thank you so very much for describing all of the steps to making this beautiful card. This is one I may have to CASE. I love the color combination you have used. These two colors look wonderful together. I also like the scallop ovals on the image and the sentiment. Nicely done. TFS!