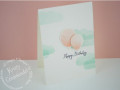
When I saw the overlapping rectangles in the sketch, I knew I wanted to create a sky using the "Triple Stamping" technique found at Triple Stamping Tutorials at Splitcoaststampers. Although technically, I only did two layers, rather than three.
I created the sky by die cutting a scalloped circle onto a scrap of cardstock using the Stampin' Up! (SU) "Circle Card Thinlit Dies", and using the "Cloudy Backgrounds" technique found at Cloudy Backgrounds Tutorials at Splitcoaststampers.
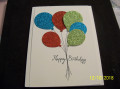
The balloons were stamped with two different shades of the same basic color using the SU "Balloon Celebration" set, then punched out with their matching SU punch.
I really like the sentiment, but to my taste it's too large for the scene, so I stamped, scanned and reduced it to 80% of its original size. Then after printing it out, die cut a cloud shape around it using my SU "Rainbow Builder" Framelits Dies. I then sponged the same blue around the cloud's edges with a bit heavier sponging along the bottom. The sentiment cloud was mounted using foam, dots and glue because of the three different panels it spanned.
Note that the balloons were given more of a "floating" look by punching out two more balloons, then gluing them behind the stamped balloon. This technique is called "Stacked Die Cuts".
The card front base is a piece of SU Marina Mist that has been run through my Big Shot using the SU "Seaside" embossing folder.
I would rate the difficulty of this card as a "3" out of a possible "5" due to all the steps it requires. No one step is particularly difficult, but it does take time and requires the use of several techniques.
Date: Tuesday, February 26, 2019 GMT Views: 1093
Favorited:7