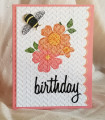
This card has a lot going on in it. I used the AHSC sketch, included flowers and a bee for DTC's two-part challenge, and on top of that I used the Splitcoaststampers weekly technique challenge to incorporate "faux pressed flowers" technique using an embossing folder. For details on how to do this technique, please visit: Faux Pressed Flowers Tutorials at Splitcoaststampers
I stamped the Stampin' Up! (SU) "Petite Petals" and "Flower Shop" flowers onto SU Groovy Guava and Flirty Flamingo cardstock using their matching inks, then punched them out. The flower centers were made by stamping SU "Botanical Blooms" centers on SU So Saffron cardstock, then punching them out with their matching dies. I also sponged each flower center to reduce how bright the yellow centers were. They were glued to their respective blossoms.
Before gluing the flowers down, I stamped the leafy branch onto the white main card panel using two different shades of green with the stamp from the SU "Summer Silhouettes" set.
After gluing down the flowers, I used the SU scalloped edgelits die on the right side of the main panel. Then put the panel into the embossing folder and ran it through my Big Shot.
The bee was created by stamping the bee from "Dragonfly Dreams" twice - once on yellow cardstock with Memento ink, then on a scrap piece of acetate from a package using Stazon ink.
The bees were fussy cut using paper snips. Note that I cut off the wings on the yellow bee, and cut off the bee on the acetate bee (I left a bridge between the two acetate wings). The acetate wings were attached to the back side of the bee with Tombow glue, then mounted on the main panel above the flowers.
The birthday sentiment was die cut from a piece of black cardstock to which I had attached a piece of Scor-Tape that was big enough for the entire word to fit. I did this because after die cutting the word out, I could lay the die with the die-cut still inside onto the white panel where I wanted the sentiment to be, and use my paper piercer to carefully push the sticky-backed word out of the die directly onto the main panel. I chose black for the sentiment to balance the bumble bee at the upper left.
Before mounting the white panel onto the SU Flirty Flamingo card base, I cut a narrow strip of Groovy Guava to fit behind the scalloped edge of the panel, then die cut it with the same scalloped die. I attached this strip to the back of the panel so that just a narrow scallop edge show beyond the white panel.
Because this card required a LOT of steps (and about 2 hours), and a lot of stamps and dies, I am rating its difficulty level at a "4" out of a possible "5".
Date: Friday, February 8, 2019 GMT Views: 1310
Favorited:3