This is a Design Team card for Try Stampin' on Tuesday Sketch Challenge #394: https://TryStampinOnTuesday.blogspot.com Because Valentines day is approaching, I wanted to use the sketch for a card for my grand-daughter. So my thoughts immediately went to using hearts instead of the circles found in the sketch.
I also received a new Brother ScanNCut2 as a Christmas gift from my wonderful husband, so wanted to try it out in making this card.
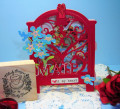
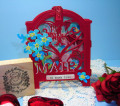
The card base is the standard A2 size (8.5"x 11" folded in half) made from Stampin' Up! (SU) Pool Party cardstock. I made an SU Real Red mat (4"x 5.25"), and cut two panels to mount on the mat; one from SU Kraft cardstock, and the other from the same SU Pool Party I used for my card base. I sized them so that together they would be 3.75"x5".
On the Kraft panel I used Versamark to stamp the Hero Arts "Fanciful Heart Filament" image randomly over the entire panel. I then sprinkled white embossing powder on it, and heat embossed. Using Copic marker #R27 (Cadmium Red), I colored in all the embossed hearts at the tip of each branch. I then glued the embossed panel and the slender Pool Party panel to the red mat using Tombow glue.
The next step was to create all the hearts I would need to fit the sketch. I started by selecting a cut file from Brother's web site called "Valentine Shaker Card". I only used the heart with the word "love" in it when I cut it out on my new Brother ScanNCut2 (CM350). It was the very first thing I cut out using my new toy - and I'm in love!!! I cut out a slightly smaller solid heart from SU Melon Mambo cardstock, and glued it behind the love heart.
Instead of the flag banner behind the heart like the sketch showed, I thought an arrow piercing the heart would be perfect. So I used my ScanNCut again to build an arrow from three different basic shapes, and welded them together to create the full arrow. I cut two of these arrows out on my cutter, one in Kraft and the other in Basic Black. For the "feathers" I used my Westcott all purpose shredder scissor on the black arrow, then cut off the feathers and glued then onto the brown arrow shaft. I likewise, cut off the arrow tip from the black arrow, and glued it atop the Kraft tip. As an extra step, I used a craft knife to cut a slit in the pink solid heart, so I could slip the arrow through it (before gluing the black feathers on the shaft) to make it look like it was piercing through the heart.
The finished large heart and arrow were mounted on the card front using adhesive foam strips for added depth. The various smaller hearts were created with Spellbinders dies and a tiny All Night Media heart punch. These were glued onto the card using Tombow.
I'm pretty excited about my new ScanNCut2, and what I was able to do with it on my very first project. I am rating the difficulty level as a "2" out of a possible "5", since something similar could be done with standard dies.
I hope my 7-year old loves her card!
Date: Friday, December 28, 2018 GMT Views: 458
Favorited:2