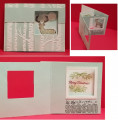
I've been focusing on new techniques and folds this past month or so. This week I decided to try out a really fun fold called "peek-a-boo flip card". It looks like a complicated fold, but it's just two rectangular panels glued together with a matching "window" in to of them. For details on how to make this fold, please visit Meg Loven's blog at: https://lovenstamps.com/wow-card-how...boo-flip-card/
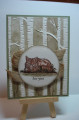
After cutting my three cardstock panels (two from SU Whisper White thick cardstock, and one from SU Soft Sky cardstock), I used the letterpress technique to emboss the front panel using the SU "Woodlands" embossing folder with SU Soft Sky ink. Pay particular attention to which side and direction of the front panel you emboss your image on so that it's oriented correctly when you assemble your card (I did it upside down on my first attempt :-)
Here is a video by Sandi MacIver on how to use embossing folders to do the faux letter press technique: https://www.youtube.com/watch/?v=WiGknbcPg8I I inked my embossing folder on the inside of the labeled flap of the folder, and used my ink pads directly on the folder's surface. This will result in your "raised" surfaces not getting inked, but the background being inked. To reverse this, just ink the unlabeled folder side instead.
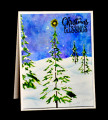
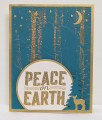
All the stamping was done with Stampin' Up!'s retired "Merry Patterns" stamp set. I used SU Early Espresso to stamp the outline of the deer on the white flip panel, then stamped him with the filled in deer stamp using SU Crumb Cake. I punched a 3/4" circle out of the sticky portion of a Post It Note, and stuck it to the background by the deer before sponging the sky with SU Soft Sky. The surprise inside window greeting was stamped from the same stamp set using SU Cherry Cobbler and Wild Wasabi ink.
The window frame on the inside of the card was cut using SU "Stitched Shapes" Framelits dies. They were glued to the inside panel using Tombow glue.
The sentiment at the bottom of the inside panel below the window was stamped first with Memento Tuxedo Black ink for the outline, then overstamped (using my MISTI to ensure alignment and to allow me to stamp it several times for good coverage) with the matching pattern stamp with SU Soft Sky.
All assembly of the three panels to create the Peek-A-Boo Flip Card fold was done with SU Tear & Tape since the folds needed to stay together even after repeated openings. You could use the red double-sided sticky tape, or Scor-Tape as well. Once your recipient gets this card, they will want to open and close it repeatedly to see how it works!
I am rating the difficulty level of this card as a "5" out of a possible "5". The hardest part of this project was getting the windows to align perfectly. The tutorial gives you good hints on how to accomplish this. I found that using steel dies that have their cutting edge near the inside edge of the die REALLY helps!!!
Date: Sunday, October 28, 2018 GMT Views: 599
Favorited:3