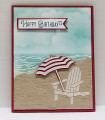
Having the setting (a beach) and the techniques (embossing) specified, I recalled that I had bought a really cool brass template back in 1991 that I had NEVER used! So with that as my starting point, I used Dreamweaver embossing paste to create the chair and umbrella on a piece of Stampin' Up! (SU) Crumb Cake cardstock. I waited three hours before going the next step, which was to tear the beach around the chair, taking care to tear off the umbrella.
I then used the embossing paste and beach chair brass template to emboss on SU Cherry Cobbler cardstock to create a red umbrella. I let this dry 3 hours as well, before cutting it out (including the pole). Because the pole goes below the chair arm, I made a second embossing paste pole to extend it all the way to the sear.
Once the embossing paste was thoroughly dry, I used my "go to" waves stamp from Purple Waves (1991) and SU Crumb Cake ink to stamp the sandy ripples on around the chair. Since I didn't want to run the risk of stamping over the top of the chair, I used my SU Stampin' Write Crumb Cake marker to add ripples close in to the chair.
The ocean was created with the Purple Wave "Waves" stamp using Versamark ink on a piece of SU Whisper White cardstock. I stamped the waves offset multiple times, then dusted it with clear embossing powder before heat setting it with my heat tool.
I place a Post-It Note over the area where the sky would be, and sponged three shades of blue over the embossed waves. Then I used the Post-It Note to cover the water, and sponged the sky. I created the clouds in the sky using a scallop circle die cut from scrap cardstock. I laid it over the sky and sponged, then rotated the scallop and sponged some more.
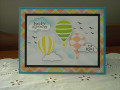
I warn you NEVER to try and finish a card after going to a wine tasting with friends!!! After I got back from the event, I had the bright idea to stamp the sentiment on the sand. What a goof-up!!! So I made another sandy "hill" using the same process as I did for the area around the chair, and glued it over my goof. the actual sentiment is from the SU "Up, Up & Away" stamp set (which I had trimmed so I could use it with only "Happy Birthday" or with the whole stamp that says "Hope Your Day in on Cloud Nine - Happy Birthday". I stamped it on Whisper White cardstock with SU Island Indigo ink, then die cut it with SU "Banners Framelits Dies". I wanted it a bit smaller so I could mat it, so trimmed it on both long sides with scissors. Note that the sentiment is longer than the banner die, so I ran it through my Big Shot only partially from the banner flag tips to half way, then removed it and finished cutting the long sides with scissors so it would extend past the end of the sentiment. The SU Cherry Cobbler cardstock used for the matting was cut the same way.
The torn beach piece was glued to the bottom of the ocean/sky piece using Tombow so that the panel was 4"x 5.25" total. I then glued this to the Cherry Cobbler card base using Tombow.
With the embossing paste dry, I cut out the red and white umbrella with small paper snips, and also the pole from the second embossing paste piece so that I could extend the pole below the chair's arm rest. It was attached with adhesive foam strips.
The matted sentiment was also attached to the front panel using adhesive foam strips to help balance the card.
I am rating the difficulty level of this card as a "3" out of a possible "5" because of the use of embossing paste. I also recommend that it NOT be created after going out with friends to taste wine :-D
Date: Sunday, August 19, 2018 GMT Views: 622
Favorited:2