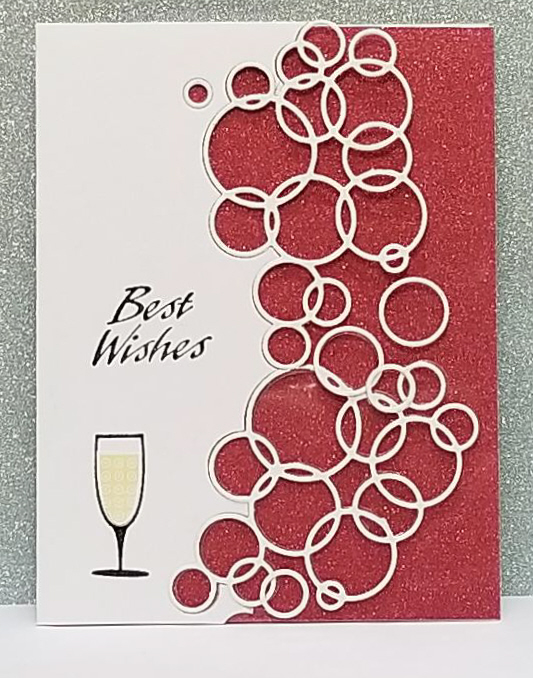
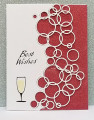
When I saw the theme, I remembered an impulse buy I made several years ago of a bubble die by Memory Box called "Loopy Rings". I thought this would be a great pairing with a champagne glass. I was inspired by a card I saw on the UK Sizzix web site, but it was an undersea theme.
I started with a standard A2 cardbase (8.5"x 5.5" folded in half). I scored the fold line to help me determine how far on the card front I wanted to die cut the bubbles... my goal was a bit more than 50% of the front would be die cut off. I had to use the bubble die twice to get the full height of the card. I saved the die cut bubbles for the next step, and cut a 5.5"x 4.25" piece of heavy acetate and glued it INSIDE of the remaining card front.
Next came the tricky part... I wanted to get adhesive onto the back of the two bubble diecuts, but didn't want to use a Xyron because it always leaves "webs", and didn't want to use glue because the acetate is so unforgiving once you smear glue on it,,, especially inside lots of diecut openings. So I decided to use mounting adhesive sheets that were die cut to the exact same shape as the bubbles. This kind of sheet has a two layers of adhesive separated by a "wax paper" sheet and has peel-able backing on both sides. This allows the sheets to be easily die cut, then peeled and stuck on the back of your white die-cut. then the backing peeled off, and the die-cut adhered where you want it. The trick I found was that it is WAY MORE EASIER to peel the "top" off your mounting sheet after it has been die cut, then stick it on the BACK of your die cut shape, then lastly to peel the backing of the adhesive on the back of the shape. I tried it the other way around and what a sticky mess!!! Do it this way and you'll have success nearly 100% of the time.
The die-cuts with their adhesive on the back where then placed back into their original positions on the front of the card so they fit into their die cut negatives.
I played around with different papers behind the bubbles, and decided on a light red glitter paper. I felt this symbolized love, and provided a nice contrast to the white bubbles. This was adhered to the back of the front panel behind the acetate sheet I had earlier glued on with Tombow. I considered gluing it to the inside back of the card, but then that left little to no room to write a message inside.
Finally, I stamped both the retired 1992 SU "Great Greetings" sentiment and champagne glass from the SU "Cheers to You" set using Memento Tuxedo Black. I didn't feel that the black pattern inside the glass looked right, so I stamped the glass again on a scrap piece of white cardstock using the retired SU Barely Banana ink pad. I fussy cut the liquid part of the image out with paper snips, then glued it over the top of its matching black pattern inside the glass.
This card will be good for either a wedding or anniversary. I am rating the difficulty level as "3" out of a possible "5" because of the care that has to be taken attaching the bubble die cuts onto the card.
Thanks to Always Fun Design Team member, Billie, for inspiring me on a way to use circles on a card in a totally different way!
Date: Monday, August 13, 2018 GMT Views: 5759
Favorited:6