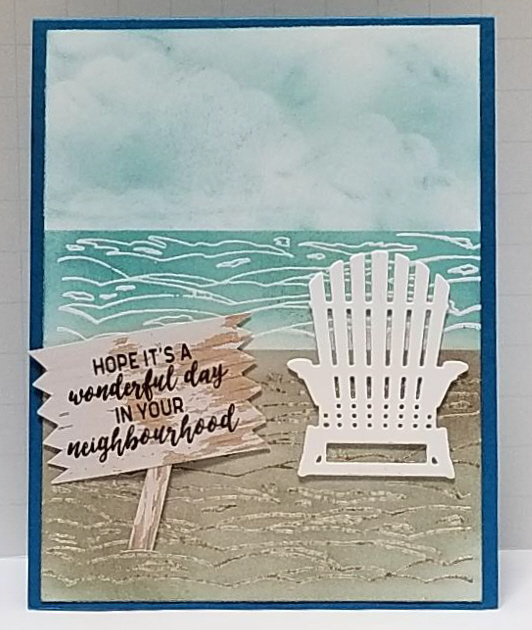
I have a 1991 stamp that is just perfect for making ocean waves,,,, and I've discovered it does a fair job a making sandy beaches, too! This stamp is a wood mounted "waves" pattern made by a company called Purple Waves in Ventura, California. I can't find them online, so they must have gone out of business. But thank goodness I found this great stamp before they did!
I used the emboss resist technique for both the ocean and the beach. This technique consists of stamping with Versamark, then heat embossing with either clear or colored powder. After the card cools, you can sponge colors over the top of the heat embossed area to allow you to see through the embossed pattern to the cardstock color below, or to complement the color of your embossing powder. For my waves, I used white embossing powder.
For my beach, I turned the stamp "upside down" so the peaks ran the mirror image of the ocean waves. Then I first inked my stamp with Versamark, then with SU Crumb Cake before sprinkling clear embossing powder and heat setting.
The ocean was sponged with SU Tranquil Tide, Bermuda Bay, and Marina Mist inks. I used a Post-It Note to mask off the sky and the beach before starting to sponge the water.
The beach was sponged with SU Crumb Cake and Early Espresso.
The sky was created by sponging SU Marina Mist ink (using a Post-It Note mask to cover the ocean) lightly, then sponging once again using a scallop circle diecut to form clouds.
The Adirondack chair was made by die cutting three copies of the chair die from the SU "Seasonal Layers" framelits die set, and gluing them stacked atop one another with Tombow. They were attached to the card front also with Tombow.
The sign was made using a weathered wood pattern from the SU "Wood Textures" designer series paper. I stamped the multi-word sentiment from the 2017 retired SU "In the City" stamp set using SU Early Espresso ink. I used paper snips to cut a rough edge on the two sides of the sign to make it look more weathered. The sign was attached to the card front using two stacked layers of Mini Glue Dots to raise it slightly off the paper for dimension.
The finished front panel was then glued to the SU Tempting Turquoise card base (4.25"x 11" folded in half to form a top folding card).
I am rating the difficulty level of this card as a "2" out of a possible "5". All the steps are very easy, and sponging is such a forgiving technique for even the beginner.
Date: Wednesday, August 1, 2018 GMT Views: 777
Favorited:4
Paper: SU Whisper White, Tempting Turquoise, Word Textures DSP
Paper Size: A2
Ink: Versamark, SU Tranquil Tide, Marina Mist, Bermuda Bay, Crumb Cake, Early Espresso
Accessories: SU White & Clear Embossing Powders, Craft Sponges, SU Seasonal Layers Thinlits Dies, Paper Snips, Tombow Multi Liquid Glue, MISTI, Mini Glue Dots, Post-It Notes