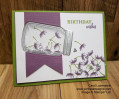
I saw Lydia do a tutorial on foil tape transfer (similar to packing tape transfer), and couldn't wait to try it! My brother's birthday is tomorrow, so I figured a card for him would be the perfect thing for this technique. I used an illustration of a guitar that I found on Pixabay.com for my image. (My brother loves playing the guitar.)
I printed the guitar onto plain copy paper with my laser printer. I stuck a piece of tape over the image, trimmed around it, and sprayed the back of the paper liberally with water. (I did end up having to blot the water up a bit, so I guess it is possible to spray too much!) I rubbed the paper off, leaving the image behind. One thing I had not considered is that the image is reversed in the transfer process. I was able to make it work with this design, but it's definitely something to keep in mind! After I had rubbed off all the paper, I sealed the image with Liquitex Extra Heavy Gloss Gel medium. It still seemed a bit tacky when the gel had dried, though, so I rubbed a coat of Ranger Multi Medium Gloss over that, which seemed to do the trick of neutralizing/covering the adhesive backing of the foil tape.
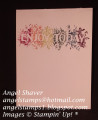
For my greeting, I used 2 stamps from "Big Birthday Wishes." I stamped the "YAY!" 4 times in different shades of blue, using my MISTI to help me get them lined up perfectly. After that, I positioned my other stamp over one of the first impressions, and stamped that 4 times with Versafine Onyx Black ink--again, using the MISTI.
I adhered my guitar piece to the panel with Scor-Tape, and matted the background with a dark teal color, leaving a 1/16" mat. Finally, I mounted that onto a piece of pale teal cardstock (A2 size) that I had adhered to a white card base.
Date: Saturday, July 28, 2018 GMT Views: 89
Favorited:2