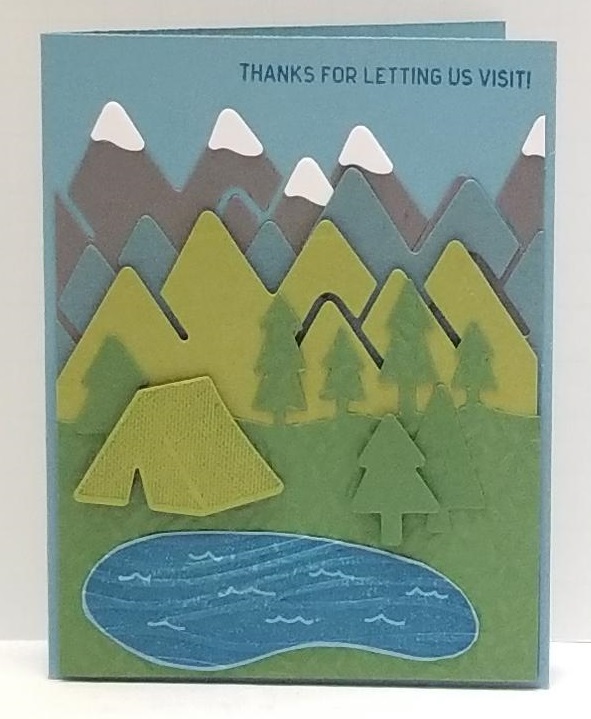
I chose the center vertical column of the tic-tac-toe: Emboss - Blue - Outdoors.
I haven't used my Stampin' Up "Always an Adventure" stamp set enough, so when "outdoors" was one of the cells in the tic-tac-toe, I knew that's what I was going to use. Having "blue" and "embossing" in the center column cinched the direction I was going to go this week.
The stamp set has a lake; hence the "blue". It also has trees and mountains; got the "outdoors"!! So that left embossing, which I decided to do with the lake and the grass. Nailed it!
I first cut 5-1/4"x 4" panels of Garden Green, Old Olive, Blue Bayou, and Basic Gray. These would be my layers on the card.
I die-cut the "Outdoor Adventure" grass with pine trees out of the Garden Green cardstock a bit over half way up the panel. Then, used the mountains from that same set to die-cut the Old Olive panel a little higher still so it would stick out above the trees . Next, I used used the mountains die again and cut even higher on the Blue Bayou panel. The final die cutting was done with the mountains again using the Basic Gray panel even higher than the blue mountains. NOTE: I offset the mountains die to the right and left for each color so the mountains didn't line up behind one another. This means I had to do a second cut with the die placed next to the cut so the mountains crossed the entire 4" width of the panel.
I die-cut five snowy caps (also from the "Outdoor Adventure" set) from Whisper White cardstock, and glued them with Tombow atop each of the high peaks cut from the Basic Gray cardstock.
Before I started assembling the layers, I ran the Garden Green "grass" layer through my Big Shot using a Fiskars Texture Plate. I decided to run the trees as well as the foreground through to give added texture.
Then I simply glued each layer down aligning the base of each panel. For added depth, I used adhesive foam strips instead of glue on the Old Olive mountains.
The lake was stamped from the "Aways an Adventure" set using Pacific Point ink on Marina Mist cardstock. I then hand cut the lake, and ran it through my Big Shot using the SU "Seaside" embossing folder. The lake was then glued down on the "grass".
For the tent, I wanted it to have some texture. I achieved this by "kissing" the tent stamp against the retired "Linen" background stamp that had been inked with Garden Green before stamping it on Old Olive cardstock. I then die-cut it using its matching die. And attached adhesive foam strips to the back of the tent.
Before final assembly I die cut 3 pine trees and glued one on the horizon behind where the tent would go, and two near the lake. The front-most tree was attached with adhesive foam strips.
After attaching the tent and trees, I stamped the sentiment from the SU "In the City" stamp set using Pacific Point ink.
Because of all the layers and special treatment, I am giving this card a difficulty rating of "4" out of "5". It wasn't necessarily hard, but required LOTS of planning and an unusual number of steps.
Date: Wednesday, April 18, 2018 GMT Views: 678
Favorited:3
Stamps: SU Always an Adventure, In the City, Linen
Paper: SU Marina Mist, Garden Green, Old Olive, Blue Bayou, Basic Gray
Paper Size: A2
Ink: SU Pacific Point, Garden Green
Accessories: SU Outdoor Adventure Framelits Dies, Fiskars Grass Texture Plate, SU Seaside Embossing Folder, Tombow Multi Liquid Glue, Adhesive Foam Strips, Paper Snips, Big Shot
Registered: June 4, 2009 Location: Deatsville, Alabama Posts: 82270
Sun, Apr 29, 2018 @ 7:37 AM
Super fun card! Love this scene.
------------------------------ Nancy Williams - Hope your day is Spirit-filled and ink-filled (in that order)!DRS Designs-DT, Punchkateerforever, Dirty Dozen Alumni