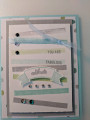
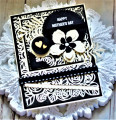
First I started with an embossing folder, Roses (I think is the name), from Tim Holtz. I brayered ink onto the front of the embossing folder and completely cover it with ink. I ran it through the Big Shot. To get complete coverage, I did this a second time. To line it up the second time, just use a little tape runner to position the paper in the folder when you run it the first time, this keeps it in position. I actually liked the results (My results have varied with this technique). It is hard to get perfect so I did get a little ink on the embossed paper but it looked good enough. Next, I cut the ink embossed paper according to the sketch. I used a square to cut the square and then I layered that on black and then cream cardstock. I added ribbon according to the sketch, I picked up this black and white ribbon locally at Michael's. I embossed the sentiment, which came from Stampin' Up! Thoughtful Banners then die cut the circle, according to the sketch. For embellishments, I used Stampin' Up! Botanical Builder dies to create the flower and I cut two foliage branches from cream cardstock. Finally I cut a black circle and a cream scallop and added two little wooden hearts (**********) then a few black gems. I also added a corner embellishment which I punched from a retired Stampin' Up! paper punch. Thanks for Looking!
Date: Wednesday, March 7, 2018 GMT Views: 964
Favorited:3