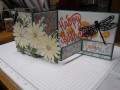
I had seen a beautiful tri-fold card on Pinterest by Lynn Starzl that featured a cutout circle and the adirondack die that I thought would make a great shadow box card. SO, using different stamp sets, I created a 3-D version with the tree limb extending out into the opening.
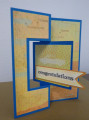
For a great shadow box tutorial, check out: Shadow Box Card Tutorials at Splitcoaststampers . You start with two 4-1/4" x 5-1/2" pieces of cardstock, and cut out a 2-3/4" circle EXACTLY centered on the panel that is going to be the front of the card.
I stamped sea oats and water birds from the Stampin' Up! "Wetlands" set in the foreground, and a tree limb from the SU "Colorful Seasons" set in the upper right using SU Crumb Cake ink. The birds were done with Early Espresso.
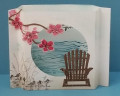
I then cut out the tree limb and the adirondack chair using the "Seasonal Layers" Thinlits Dies from SU Kraft cardstock. The limb was glued to the upper left corner so that it extended out into the circle opening. To strengthen it, I die cut another limb and glued it to the BACK of the so that it matched exactly.
The chair was stamped with Crumb Cake ink using the Stampin' Up! "Hardwood" background stamp to give the chair a wood texture. This was glued to the card front so that it extended out into the circle opening.
The flowers from the "Colorful Seasons" set were stamped (and some "stamped off") using Melon Mambo ink on SU Blushing Bride cardstock. The flower centers were stamped using Early Espresso. They were cut out using the "Seasonal Layers" die cuts, and attached to the limb using Mini Glue Dots. Again, I added a second flower die cut to the BACK of each blossom extending into the opening to give them strength, depth, and prevent the glue dots from sticking to the back panel.
The back panel was created by stamping Purple Wave's wave pattern repeatedly to the bottom two-thirds using SU Pacific Point ink. I then sponged the water and sky with various aqua and blue inks. The background was finished by stamping a triplet of flying geese (or sea birds?) in the sky using the Stampscapes Geese stamp and Early Espresso ink.
Finally, both panels were scored 1/2" and 1" from each side edge. The left-most and right-most scored sections were taped using Tear & Tape (or any extra strong craft tape), being sure to have the tape butt against the score line and outside edge of the card. Then crease the scores and CAREFULLY attach the front panel to the back panel. The card is self-standing, so makes for a nice display. You can write your personalized greeting on the back of the card.
I am rating this card's difficulty as a "4" out of "5" because of the multiple steps, careful circle placement, and multiple steps. The card took me about 45 minutes to complete. It was fun to create, and I like the results, but you do invest some time in making it - well worth it if you have a special person in mind who you plan to give it to!
Date: Saturday, January 20, 2018 GMT Views: 2662
Favorited:12
Ink: SU Melon Mambo, Pacific Point, Soft Sky, Marina Mist, Early Espresso, Crumb Cake
Accessories: SU Seasonal Layers Thinlits Dies, Scoring Tool, Big Shot, Tombow Multi Liquid Glue, Mini Glue Dots, Spellbinders Circle Dies, Stamping Sponges, Tear & Tape