On the tic-tac-toe matrix I chose to use the two lines that both start at the top left corner - one that goes diagonally down to the lower right (trees-diecuts-shine), and from the upper left going straight down (trees-Christmas-silver/gold).
I was inspired for this card by one created by Judy Strickland on Pinterest... I changed the colors, added an element and didn't use another element. Here's her card: http://judyscreations.typepad.com/my...christmas.html
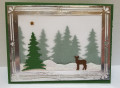
To create this card I first used my Xyron Laminator to coat the back of a 4"x 5-1/4" silver piece of foil with adhesive. I then adhered the foil to a piece of scrap SU Whisper White cardstock. Using this foil piece I die-cut the frame using the half-frame die from the Stampin' Up! Card Front Builder Thinlits Dies set twice - positioning the half frame die to create a full frame.
I then die-cut four each of the two pine tree clusters using , and glued them down on an SU Garden Green 4"x 5-1/4" panel so that "sat" about 1" from the bottom of the Whisper White panel.
Next, I cut a piece of translucent white vellum to 4" x 5-1/4", and using a Snail Adhesive half-on/half-off the edges of the vellum, put a very narrow strip around a four sides of the Whisper White panel that had the trees attached. I then laid the vellum carefully onto the panel so all four edges were attached.
Next, I hand-tore a narrow strip of Dazzling Diamonds Glimmer Paper in an irregular fashion to create "snow banks. To make the Glitter Paper less thick, I peeled as much of the paper layers off the back of the strip as I could manage. I did this because I wanted to put two layers of "snow", and wanted to avoid the bulk two layers of glitter cardstock would create. These were glued down with Tombow glue so that one layer of "snow" was narrower than the other to give the illusion of depth to the snowbanks. I trimmed the edges of the Glitter Paper to be even with the under-laying Whisper White cardstock panel.
Next, I glued down one tree "in front of the others" on top of the vellum, and die-cut the deer from Chocolate Chip Cardstock using the same Thinlits set as for the frame.
Finally, I used Tombow Glue to attach the silver foil frame on top of the entire card panel. I added the gold star by die-cutting a small scrap of gold cardstock using the same die as was used for the silver frame. I glued this gold star using Tombow Glue.
The entire panel was then glued using Tombow Glue to a Garden Green card base.
All the gluing is a bit messy, so be careful will you glue the silver frame to the front panel so you don't get glue residue on the shiny surface. I also don't particularly care for how the deer's legs are made with the die, so I used tiny scissors to cut a little "v" in his hind legs to give them more reality.
I'm rating this card as a difficulty "4" because of all the careful gluing that needs to be done.
Date: Tuesday, October 31, 2017 GMT Views: 1928
Favorited:10
Registered: February 27, 2012 Location: Greensboro, Georgia Posts: 150
Thu, Nov 02, 2017 @ 5:22 PM
I love this gorgeous scene you created! The frame is perfect to showcase your winter wonderland! SO happy you joined us at The Paper Players this week! XX