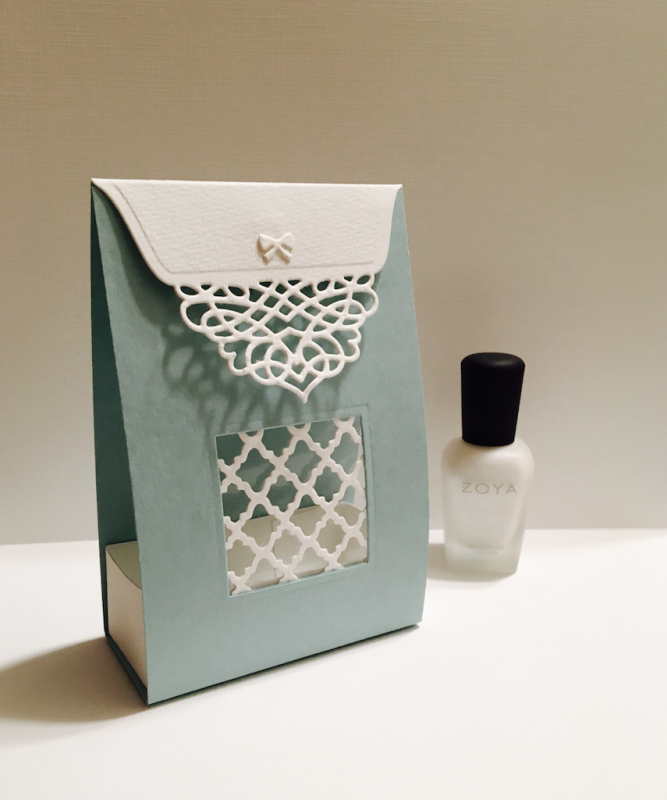
I LOVE to make tiny bags....and I usually use die cut 'scraps only' to decorate them. In this case however, I used the whole middle of the Spellbinders Die set because that label sized die could wrap around the top as a closure (there is a tiny magnet under the front flap, and on the front top of the wrap around that allows you to open and close it easily). I normally put a food-safe bag of those little white snowball candies in there (winter weddings), or simple tiny white gumballs for other seasons, but I didn't have any today. Another difference with this one and the first project, is that the window is only in the front, and it's much neater on the back with a small square of acetate to keep everything tidy.
Not a big difference in time to build, took about 15 minutes once I knew how I was going to close it (and most of that time is waiting for glue to dry). I found the video for the original bag design; here:
Tip: Use the primary wedding color for the wrap around piece, and buy candy that has the other colors so that their colors will peek through the window!
The white nail polish is there for scale....but isn't white nail polish like a staple for weddings too-LOL. Hope you like it! Hugs,
Audrie
Date: Sunday, October 30, 2016 GMT Views: 1007
Favorited:5
Accessories: Spellbinders Quilt Die (forgot the name but it's a big die with that diamond pattern), Spellbinders Tranquil Moments, Impression Obsession Wedding Bows, Tiny Magnets (you can open and close it from the top)
Techniques: Hostess Favors, Wedding Favors, Die Cutting