Registered: February 20, 2006 Location: Marshfield, WI Posts: 815
Thu, May 04, 2006 @ 7:50 AM
Lovely, just lovely! I can't wait til my class in 2 weeks!
------------------------------ Lovin' what my life holds! Visit my blog at www.stampinunicorns.blogspot.com Visit my facebook page at https://www.facebook.com/stampinwithelizabethgiles/
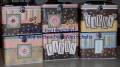
They were on sale for less than $4 each when I got them.
One question for all of you fabulous ladies who have been doing these tins...how do you get the paper around the handles on the lid? I had a hard time with this on my first tin and wondered if there is an easier way than what i came up with. Any advice would be so appreciated.
Registered: May 2, 2003 Location: Central Wisconsin Posts: 3251
Thu, May 04, 2006 @ 11:26 AM
Thanks for all the nice compliments! These tins are so much fun, and I think everyone loved making theirs!
As far as instructions:
I used Royal Coat decoupage. I applied a thin layer to the tin and then a layer to the paper, and then adhered the paper to the tin, strip by strip. After all the paper was on, I coated it all with another layer of decoupage.
I made my own template for the latch cut-out, as well as for the top where the handles come out. We used two separate, overlapping pieces for the top, each shaped somewhat like a flat "W". (The valleys of the "W" were where the handles were.) Even with the template, it seemed that each tin was a little different and we had to shave a little off to get it to fit just right.
For the inside, I made dividers (6-15/16 x 4-1/4) that had tabs made with the two SU circle punches.
Give it a try! They're so easy and can be used for so many different things!