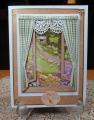
This is "my" interpretation of Vintage as I am too neat to rip and tear & distress edges & I struggle to embellish my cards with a ton of stuff which experienced Vintage cardmakers seem to do - it makes my brain freeze LOL! I love what other people do - I just can't seem to work out how to do the same! So I guess you could say my card is more "vintage-inspired" rather than truly Vintage (?).
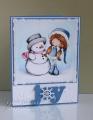
The main image is from the Graphic45 Springtime #4500650 sheet which already had the beige and green borders so all I had to do was cut it out and distress it using my Ranger round blending tool and Antique Linen Distress ink. I added some Summer Flowersoft to some of the flower centres using tacky glue and once dry, added some Stampin' Up Dazzling Details glitter glue for a bit of sparkle. This panel is attached to my card using 0.5mm dimensionals.
The designer paper on the card base and panel is also from Graphic45 from their Baby 2 Bride Collection which I have had for ages and is from 2007 (how's that for hoarding?!!). I also distressed the paper using Antique Linen Distress ink. The green cardstock was trimmed to 1/8" using my Perfect Layers tools.
The bottom punched border is my all-time favourite: Martha Stewart Doily Lace.
I dyed the seam binding myself using a mix of acrylic paint colours: JoSonja Skin Tone Base and Folk Art Peach Cobbler plus Textile Medium in equal quantities. The seam binding and bow were added in 2 separate elements and the bow itself was made using my Bow Easy. I added Fray Stop to the cut ends to stop them from fraying
The paper rose was originally cream but I added some watered-down paint to match the seam binding then added a some Dazzling Details for sparkle. The green part underneath the ribbon was originally a bright green which didn't match the rest of my card so I trimmed it off then punched a star from the same green cardstock that I used on my card and glued it on.
I diecut 2 x Vintage Corners from green cardstock using my Cuttlebug, distressed them using Antique Linen Distress Ink then glued them to the top of the main image panel using Tombow Mono Multi glue. I punched a butterfly from some matching peachy coloured Secret Garden designer paper using a Carl CP-1 Butterfly-A punch, added 2 tiny pearls from my stash then added a little bit of Dazzling Details glitter glue.
This card will be going to my SIL for her birthday. Thanks for having a peek at my card! Please come and peek at my blog - this link will take you directly to my blog post ---> http://instead-of-ironing.blogspot.c...-birthday.html I have close-up photos so you can see the detail more clearly.
Date: Friday, January 9, 2015 GMT Views: 2016
Favorited:7
Registered: June 10, 2011 Location: Canberra, Australia Posts: 7394
Fri, Jan 09, 2015 @ 4:24 PM
This is such a beautiful vintage card. I love that Graphic 45 paper pad as well. Love those matching corner dies and the perfect little flower and bow. Its in my favourites.
Registered: May 9, 2008 Location: N.Tonawanda, NY between Buffalo and Niagara Falls Posts: 2747
Wed, Jan 14, 2015 @ 6:24 AM
It most certainly is vintage, loving the little scene and the pale yellow is so pretty. Lots of work on this one and it shows, Stunning and nicely done.
------------------------------ Sue Drees MY BLOG Proud Fan Club Member "I'm thankful that in God's design, he planned it so your path crossed mine"
Registered: January 29, 2006 Location: Mount Forest,Ontario Canada Posts: 11633
Fri, Jan 16, 2015 @ 3:14 PM
You have done a great job on this and all the embellishing is beautifully placed to accent your image panel. I have those cb corners and they can also be tucked behind the panel as I learned from YvonneAna here: Easter Card by YvonneAna at Splitcoaststampers
------------------------------ Michele
My God shall supply all your need…Philippians 4:19


 . I have those cb corners and they can also be tucked behind the panel as I learned from YvonneAna here: