This was my club project last night. Instead of making several projects, we only made this one. If I were to do this project again, it would be as a stamp camp.
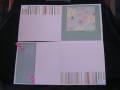
I have several photos of this project that can be viewed under my gallery in different stages. This is the 12 x 12 cardstock book fully in the open position. To see the previous position with the upper left corner folded to the right, see this link: Gallery at Splitcoaststampers
The project is made by scoring the 12 x 12 cardstock at 6 inches on one side, turn 1/4 of a turn, and then score at 6 inches again. Cut on one of the score lines from the edge up to the middle. Fold the cardstock onto itself as follows: fold the lower left corner to the right, fold the lower right up, fold the upper right to the left. When folded in this manner, the result is a 6 x 6 scrapbook card (a ScrapCard?) that has a total of seven 6 x 6 scrapbook pages (unless you also want to scrap the back). Note: once the card is folded up, you will need to "square off" the card because some of the edges will become uneven.
Everyone last night also received a SU vellum 6 x 6 envelope, so this book can be mailed to a loved one.
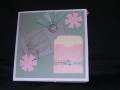
In addition to the ScrapCard, one of the pages pulls out of photo corners and has a flap on the back that folds out to make a standing photo frame.
Date: Saturday, April 8, 2006 GMT Views: 584
Favorited:14
Registered: May 2, 2005 Location: finally in Florida! Posts: 49528
Sat, Apr 08, 2006 @ 1:58 PM
This is such a neat idea, but I must be brain dead cause I can't get the folds to make 7 pages. Do the pages have to turn a quarter turn for page 4&5? and again for pages 6&7?
Registered: March 23, 2005 Location: Columbia, South Carolina Posts: 2788
Sat, Apr 08, 2006 @ 6:26 PM
When you fold up the cardstock b/c of the cut on the side, and you fold up as in my directions, two of the pages are only shown as you open the first flap (and then it flips to the backside when you) then flip up the next flap, (and then that flap goes to the backside), and then you have resultant of this picture. Sorry. Makes more sense to hold this IRL.
BUT, just make a mock up of this in any size scrap of paper. Make it square, fold down the middle, turn, fold down the other middle so your square is now 4 squares. Cut one of the folds to the center, and then start folding the bottom most edge to the right, then that section up, then THAT section left, and you have the "book".
Hope that helps! :S
------------------------------ Lori (a.k.a. Gladd-lyStalking) My Small and Outdated Gallery
I Love Being a SU Demonstrator!