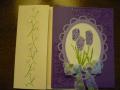
This is a card that I made for friend and fellow stamper, Deb in 2011. She loves purple just as much as I do, so this card HAD to have some purple in it somewhere! I made this card very shortly after making Sally's Birthday Card 2011--within a matter of about a week.
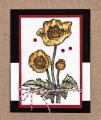
These two cards show my first efforts trying the direct coloring onto a stamp with Marvy Markers, all three cards in the Blast From The Past have used that technique, and all 3 cards were made for members of the same family of dear friends.
As mentioned in Sally's Birthday Card 2011 description, I discovered the wonderful CANADIAN company, The Vancouver, BC based The Local King Rubber Stamps Company at a stamping/scrapbooking show near Toronto, Ontario, the show is called ScrapFest and is a bi-annual event. This stamp company is owned by a very hard-working husband and wife team who travel through North America doing MANY major crafting shows throughout the year. If you see their booth, you will normally see a HUGE crowd of crafters watching co-owner, Lisa or her husband, Nador demonstrating this technique of using Marvy markers to directly color onto their stamps and then stamp onto cardstock. Although this technique works well on regular cardstock, the colors seem to just come alive if you use their special glossy cardstock--and I have found this to be the case as well. It was explained to me by the owners that they import this glossy cardstock (I do not remember its origin, sorry), and that this glossy cardstock is not like other glossy cardstock, that it has a special clay ingredient. They sell this cardstock in packages of 40 pieces, I think it's approximately an ATC size. I used that CS in the first card (Sally's Birthday 2011), you can get a better indication of its size. At the time, it was $8 for I think 40 pieces, I thought it was a good price, especially considering how much it brings the colors to life on the stamped image.
Now many of their stamp sets have matching Spellbinders dies, at the time I created these cards, I did not have the matching dies. I would guess that this technique would work with any water-based markers, like Tombows or SU's markers. I have a good supply of Marvy in both LePlume and brush markers, so I used those. Marvy markers were used exclusively at the Local King booth, and it was explained that because this ink dries slower, there is more time to color on the rubber stamps, and one doesn't need to do the usual "huffing" on a stamp before stamping onto the cardstock. If you use other markers, you may find you do need to "huff", but if you already own other markers, it makes sense you'd use what you already own of course!
This coloring technique was one that I found was very easy--see my first efforts on the two cards... For a comparison of the image on glossy vs regular cardstock, see the view of the card with the envelope front where the same image was stamped on regular white cs vs glossy white cs on the card front.
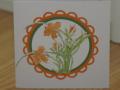
The main image was cut using a Spellbinders oval die. Then the edges of the oval were distressed using a sponge dauber and SU lilac ink. The lavender glitter cardstock was cut and embossed using one of the Lacey Ovals dies.
The card base in Lovely Lilac (one of my all-time favorite purples from SU. I'm always so sad when one of my favorite cs colors is discontinued, such a loss!) was dry-embossed using a Sizzix EF. I highlighted the EF further on the card front by covering the highlighted areas with glossy accents in both corners--I like how that turned out. The polka-dotted glittery ribbon (on sale from Michael's) was affixed using a glue-dot.
The cream-colored A2 envelope flap (at the time I didn't have white envelopes so cream had to do) was embossed using one of the very first Cuttlebug embossing borders from one of the original border sets. This dry embossing was further highlighted by using Sakura Stardust glitter pens (I LOVE these!!! ) in various colors--you can see a bit of the gleam on that envelope flap. I'm sorry that it's not possible to see all of the glitter on the lavender frame on the card front nor the epoxy shine on the highlighted dry embossing in the corners on the card. It looked better in person, but at least you can see a bit of each for some idea. The double bow on the ribbon was tied using the wonderful Bow-Easy, and I deliberately kept the tails of the bow longer so it would trail on the table, and each end was cut in an inverted "V".
I had a lot of fun creating this card, and look forward to getting back to doing hopefully a lot more of this coloring technique on subsequent cards and other projects.
Thanks so much for checking out this card and envelope. It means so much to me when you stop in and look, and when you leave a comment, it absolutely makes my day!!! It is my goal to learn from your comments and to become a better card-maker. I'm so grateful to be a member of SCS, how I love having a gallery here and interacting with all of you--I've met so many wonderful artists here, and have learned a great deal from you--thank you!!!
Joanne
Date: Monday, August 18, 2014 GMT Views: 2757
Favorited:2
Registered: February 3, 2005 Location: Delray Beach, FL Posts: 34769
Tue, Aug 19, 2014 @ 3:35 PM
Oh, Joanne, this is beautiful, and I'm sure Deb will love it with her favorite color! Beautiful details, and lovely coloring, with the ribbon and embossing! I love it! Hugs!
------------------------------ Cheryl
Proverbs 3:5-6 My blog
Registered: January 29, 2006 Location: Mount Forest,Ontario Canada Posts: 11610
Fri, Aug 22, 2014 @ 9:55 AM
Joanne, I went to scrapfest in Kitchener this year and saw that glossy cardstock and the colouring and diecut technique. Yes, there was a ton of interest. There was a very talented Asian gal doing the demos. Your card and colours are beautiful. Purple tones always seem to make up some of my best cards too. Love all your choices and execution.
------------------------------ Michele
My God shall supply all your need…Philippians 4:19
Registered: September 20, 2006 Location: Sarnia, Ontario, Canada Posts: 3734
Wed, Mar 11, 2015 @ 1:22 PM
Joanne, your card turned out beautifully. Like you, I fell in love with Local King Stamps. I'm in Sarnia, living on the US border, so I met them when they did a show near Detroit, Michigan. I bought several of their stamps. He has quite the sense of humour, eh? I ordered glossy cardstock from them a couple of months ago. Your flowers are coloured so beautifully and to find that cute matching ribbon is a nice bonus.
Registered: July 4, 2014 Location: Modesto, CA Posts: 5909
Sun, Jul 10, 2016 @ 10:44 AM
Beautiful, Joanne. Time for some new additions to your gallery--what have you been up to lately?
------------------------------ Visit the Sketch Challenge on Wednesdays! Take the DOUBLE DARE on the 2nd Wednesday of the month with a fun fold & sketch.


 I made this card very shortly after making Sally's Birthday Card 2011--within a matter of about a week.