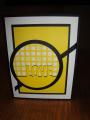
I die-cut "love" in the center of a piece of yellow cs, then I superimposed the circle die over the word, and cut it out. This gave me two circle pieces, the "positive" word/circle part which I used on this card, and a "negative word/circle part (which I can use to make another card). I did the same thing with the patterned paper, but for this card I used the "negative" word/circle part. When the two pieces are put together, they form the circle. I cut a black circle one size larger, then glued the patterned piece down. I used dimensionals to adhere the lower part of the circle (yellow cs). This gave "love" a shadowy effect. My card base is black. Layers: white cs is 4 x 5 1/4; black cs is 3 1/4 x 4 12; yellow cs is 3 x 4 1/4. I cut a piece of black ribbon to go diagonally across the card. One end wraps around the white cs, and the other end goes under the "love" circle and is cut on the diagonal. This was an experiment, which I thought turned out well. It's simple with clean lines.
Date: Monday, July 21, 2014 GMT Views: 319
Favorited:3
Accessories: die cutting machine, love die and circle dies, black ribbon
Techniques: I combined a "love" die and circle dies to make this card. The positive "love" image (in solid color) is raised with dimensionals. The negative "love" is on the patterned paper so it looks a bit like a shadow image.