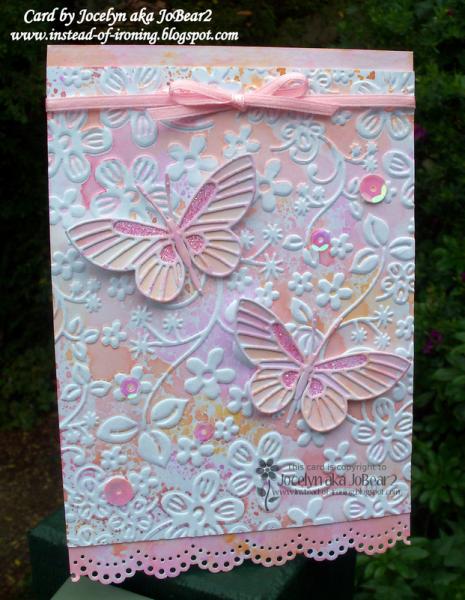
I used a Crafter's Companion 6" x 6" square Die-sire Floral Embossalicious embossing folder for the stamping and scribbled on various colours of Tombow pens - numbers 723, 090, 993, 991, 673. I sprayed on some water using my Ranger Mini Mister then lay my Tim Holtz Distress Watercolor paper on top and used the smooth side of the paper.
I left my watercolour paper on top for about a minute and pressed down with my fingers to make sure I had good coverage on the paper, then lifted it off. I dried off the paper very thoroughly with my heat-gun and put it aside for a little while. In the meantime, I scribbled the same colour Tombow Pens onto my Craft Mat, sprayed on some water and used another sheet of watercolour cardstock to smooch the colours around so that I had matching cardstock for diecutting the butterflies and for adding the top and bottom borders.
I decided to run the stamped background through my Big Shot using the same embossing folder to add some texture but had to be extremely careful to match up the stamping with the embossing folder and added plenty of removable tape to secure it in place so the cardstock didn't move. In fact, my first attempt was a FAIL because I didn't quite line things up so had to start all over again.......unhappy sigh...... but we learn from our mistakes, don't we?!
What I discovered is that the watercolour cardstock tends to stretch a little in the Big shot because the embossing is pressing into what you have stamped so when your folder is very detailed like the one I used, you do end up with one end matching well and the other end goes a bit 'out' as the cardstock stretches. Anyway, I do love how pretty and lacy it turned out with the added embossing/texture.
The butterflies are dies by Memory Box - Moonlight Butterfly (which is the butterfly base) and the matching Kaleidoscope die (which is the detailed butterfly top). The body/antennae is a separate die from the Kaleidoscope set. The Moonlight Butterfly die comes with a body/antennae die too but it is slightly different to the Kaleidoscope one.
I glued down just the centre of the butterflies using Tombow Mono Multi glue so I could bend the wings up a little. The bottom border was punched with a Martha Stewart Lace Doily edge punch which was difficult because the cardstock was a bit too thick and it jammed! Fortunately, after a few moments of choice words, I was able to finally get it to punch right through but I won't use the watercolour cardstock in it again - I have learned my lesson! I only just replaced this punch a few weeks ago so hopefully I haven't shortened its life!
I added some Pink Kindyglitz glitter glue to the butterflies and used Glossy Accents to add some pink 8mm sequins and some clear 5mm sequins. The clear ones are fantastic because they pick up the colours around them so they look like pink ones!
Lastly, I tied on the pink ribbon and added Fray Stop to the cut ends. I wondered if I should add a sentiment but really didn't want to cover up the pretty background so left it off.
My niece and her partner recently became engaged so this card will be going to the happy couple but I think you could use the card for alot of different occasions and not just for an engagement.
I also made this card for the SCS Free for All Friday Challenge F4A223 of Use that Stash! For me, it is the butterfly dies. I have a lovely stash (which is continually growing) of butterfly dies - all brands - I love them 'cos they're just so pretty (especially the Memory Box ones!) but keep forgetting to use them on projects - and, because I don't embellish my cards alot, they don't seem to "fit" anywhere. This time, I made a huge effort to use them and I am so glad I did!
Registered: July 27, 2005 Location: PA Posts: 4111
Wed, Jun 04, 2014 @ 2:50 AM
This is quite beautiful! I have that butterfly die and I love the colors that you used, so I'm off to try it for myself! Thanks so much for all of the details!
Registered: January 20, 2010 Location: Brampton, Ontario Posts: 26218
Wed, Jun 04, 2014 @ 4:51 AM
Love the way you embossed the white pattern in your background. Those butterflies are just SO pretty and look great in matching colours. The scalloped border is the perfect finishing touch. Wonderful card!
Registered: February 9, 2010 Location: Mentone, California Posts: 7361
Sat, Jun 14, 2014 @ 7:52 PM
LOVE LOVE LOVE this...I missed it last week. It was so much fun reading your details and I am amazed at all your steps for this beauty. It is wonderfully designed and your color choice on this ROCKS! JUST BEAUTIFUL!!!!