Registered: July 29, 2005 Location: Stampin' with the new rubbah the posse sent me!! Posts: 8734
Mon, Mar 27, 2006 @ 5:08 PM
Oh this was SO worth the wait! Please share the directions!!
------------------------------ "If toast always lands butter-side down, and cats always land on their feet, what happens if you strap toast on the back of a cat and drop it?" -Steven Wright
Minglerville Blabber Creative Crew SU Design Team Alumni
Registered: August 14, 2004 Location: Posts: 98098
Mon, Mar 27, 2006 @ 5:15 PM
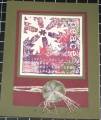
This is beautiful! I love the colors you used.
------------------------------ Debra the Debrameister Nagigator Mingler Gallery My Blog: Yellow and Blue SU Creative Crew Design Team Member-May-August 2011
Registered: January 4, 2004 Location: Tulsa, Oklahoma Posts: 2594
Mon, Mar 27, 2006 @ 5:43 PM
Here are the instructions. Pretty easy to do. And thanks for the nice comments! Take about 5 ply of CHEAP toilet paper and spritz it with water till it's pretty wet. Lay your stamp face up and place the TP over it. I use one of our stipple brushes to pounce the paper down in the grooves of the stamp. Then add 3-5 more ply one layer at a time and stipple and spritz if necessary. I usually don't spritz on the last couple of layers. I let it dry (but not completely) for 30 min to an hour and then take off the stamp and color w/wc crayons. You can tear the paper around your design while it's wetor you can trim it with scissors when dry. Bold images work better.
Registered: April 28, 2005 Location: Hoosier Land Posts: 22942
Mon, Mar 27, 2006 @ 5:50 PM
This one is awesome!!! I love it. I don't have the WC Crayons...wonder if you could use the blender pen or something else?? Any thought? It's so pretty!!