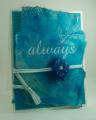
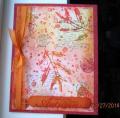
I had started this piece of paper a while back when I was using a brayer with blue paints and used a scratch sheet of paper to clean it off. I had already stamped the leaves in silver over this. I added the script in Navy and spatter in Indigo. I added some caulk through dry wall mesh and chalk paints also through mesh and over the caulk. I tore my piece then wiped silver ink along the edges. My button is four layers of Pacific Point glued together then embossed in the Elegant Bouquet then rubbed Versamark over the raised areas and brushed on the PearlX. I wanted it a bit shiny, so I layered CE over this. I punched my holes with a Cropadile then wished I'd used something smaller as the holes were pretty large for my more delicate looking "button" so I used ribbon along with cord to thread through the button. I have a Whisper White base with a frame of Turquoise embossed in the lattice ef with Indigo sponged over it. I popped my panel angled over this. I think I'll go back and use a couple of dimensionals behind the button as it is floating more than I'd like. I didn't want to cover up my panel so I used a rubon sentiment.
Date: Thursday, March 20, 2014 GMT Views: 1457
Favorited:3
Registered: August 7, 2007 Location: North Carolina Posts: 28113
Thu, Mar 20, 2014 @ 3:57 PM
Wow! This is amazing! Love all the texture and your home made button is gorgeous! Love it with both ribbon and cord!!!
------------------------------ MY GALLERY My BLOG
No card is complete without at least one cat hair
DT: Our Daily Bread designs
Happily a Fan Club Member Romans 6:23
Registered: April 6, 2006 Location: Las Vegas, baby! Posts: 14945
Thu, Mar 20, 2014 @ 5:01 PM
I am in awe of your artsy endeavors! I love everything you've done, and appreciate that you've explained what that was, exactly. I especially like the button - I thought that you'd discovered an awesome vintage treasure
------------------------------ ~ Sue Happy for no reason...