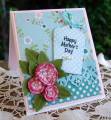
Helen...she loved yellow roses. And when we "knocked around town" , (as she would say), we both loved to visit the local nursery. In honor of my mom, and Mother's Day, I am making cards for family using one of Mom's favs.
I had a few requests about the rolled roses from this card, and since I was making roses all day Saturday, decided to take a photo of my stamp table with the "gear".
1. Scallop punch, or scallop scissors and leaf dies/punches
2. Sponge edges of scalloped circle
3. Cut in circular motion, trimming away just the scallops, leaving a tear drop shape
4. Use quilling tool to roll, and hot glue into place
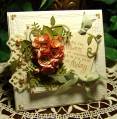
Sometimes, I like to roll very tightly to make just a rosebud. When left to "unwind" a bit, the centers can leave a blank spot, and a pearl can be added. It makes for a very sweet look. Most of the time I set a base of leaves and glue blooms into place, and then add more leaves to fill in the blanks.
The type of paper can change the look too. Yesterday I made some of the buttery colored blooms from paper that is nearly crepe- it tears easily, so gentleness is called for, but I doubled that paper and the blooms came out looking like those roses that have double centers.
I use Martha Stewart Rose Leaf and Branch punches most of the time. When I do the rose leaf, I always run a stylus down the center and sponge the edges, and give one side a bit of a fold. Another favorite addition is the Cheery Lynn Fanciful Flourish- it is so elegant and sweet. The mini fern is from SmARTworks, and it is just perfect enough to tuck into wee lil "bald spots" when arranging.
EDIT: To achieve a more realistic and Vintage looking bloom, soak scalloped circles in cool water for about a minute, scrunch into a ball, leave for about 5 mins. Open and allow to dry. Then follow the same instructions above.
Registered: May 18, 2008 Location: Virginia Posts: 24623
Sun, Apr 29, 2012 @ 8:55 AM
OMG Mrs. Buckle, this is so darn bee-u-ti-ful! I have a diecut for rolled roses, but I really, really want to try your techniques. Thanks for posting it for us. You are Da Man's Best Cowgirl!
------------------------------ Pam Co-Founder of The Punchkateerz! Fan Club Member FS149, QFTD44
Registered: July 25, 2004 Location: Hog Wallow, KY Posts: 38242
Sun, Apr 29, 2012 @ 9:17 AM
Pat I love your flowers. They always look so yummy. I also love the greens you use. I love the idea of using the SU scallop circle the way you did. Great flowers, tfs.
Registered: February 21, 2007 Location: Bay City, MICHIGAN Posts: 17556
Sun, Apr 29, 2012 @ 5:37 PM
Awww, your Mom's favorite - what a way to spend the day than to make a bunch that brings back memories of your knocking around town with her!!
Just using the OUTSIDE of the scalloped circles keeps your blooms wee size - so perfect - what an awesome tutorial - just like your hydrangea one. Thanks so much for sharing yourself with all of us and your wonderful techniques - these roses are so beautiful, you will be putting someone out of business!! LYMI!
------------------------------ SUE aka GREENIE - Twisted Sistah Handmade cards because..No one displays an email on their mantle, or saves a FB post in a box of treasures! Nothing is impossible with God!
Registered: December 24, 2007 Location: Posts: 12163
Sun, Apr 29, 2012 @ 6:03 PM
This is an awesome tutorial Pat....Thanks a bunch for showing us....wow, they make gorgeous blooms!!
But then its probably the gorgeous lady doing it!! LYMI hugs
------------------------------ Fan Club Member:
Teapotter's & Twisted Sistah's member The joy of the Lord is your strength. Neh. 8:10