For links and complete details, please visit my blog.
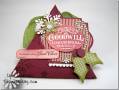
I had this idea in my head that I wanted to create a little sled that I could include on a gift tag, so I searched the Internet and I saw this tutorial and found what I was looking for.
I followed the directions, painting my sticks red before I stamped an image from Nordic Winter on each of the sticks. I stamped the image using VersaMark and then embossed with white embossing powder. The wood took the heat embossing wonderfully. After painting and stamping all the sticks, I followed the directions and glued the pieces together and let it dry quite well before I proceeded to the next step.
Next, I added some glue to the tops of each of the slats of my sled and applies some Polar White Flowersoft, which looks great as snow on my sled and the top of my sentiment bookplate. I adhered the sled to my tag using some sticky tape because I wanted it SECURELY attached.
I added a silk ribbon that I layered with some die cut foliage, a Prima flower, more ribbon and a bit of bakers twine. For me, when created an embellishment for an embellishment (giggle), the more layers, the better.
{Supplies}
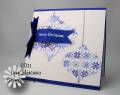
Stamps: Nordic Winter, Compliments of the Season (Waltzingmouse Stamps)
Papers: Lipstick Red and White cardstock
Ink: VersaMark, Warm Red Color Box Chalk Ink, VersaFine Onyx Black
Additional Supplies: Popsicle Sticks (Michael's), White Embossing Powder (Stampendous), Red Acrylic Paint, Red Silk Ribbon (Creative Impressions available from i{heart}papers.com), Fiskars Aprin Lace Border Punch, Fine Crystal Snow (Stampendous), Polar White Flowersoft, Prima Flower from stash, Baker's Twine (available by the yard at i{heart}papers, Ribbon from the October Club Assortment (Really Reasonable Ribbon), Tim Holtz Tag & Bookplate Die
Date: Friday, November 4, 2011 GMT Views: 937
Favorited:8