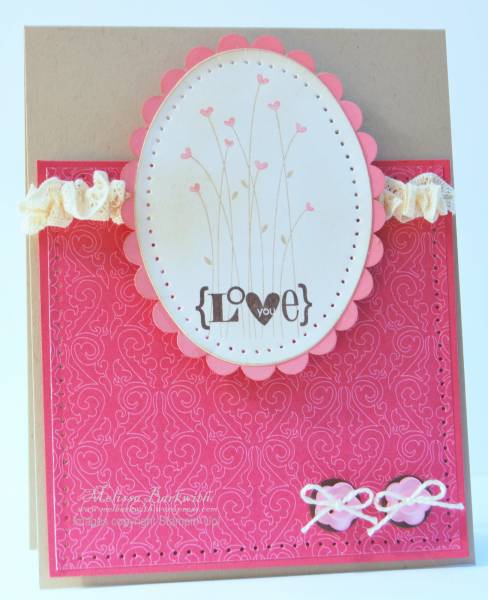
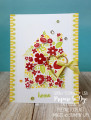
I wanted to come up with something that would be easy to either mass-produce or to use in a Stampin' Up! workshop.
While this is the stepped-up version, you could make this card more quickly by omitting the paper piercing and/or sponging.
SCALLOP EDGE around the oval - Since I don't have nesties in all shapes and sizes, I use this technique to make my scallop edge. It sounds really fiddly and time-consuming (and it is the first time), but once you get the hang of it, it only takes a couple of minutes to do.
Take a piece of paper and punch out a 1 3/8" circle. Centre your scallop circle punch over your circle cut out and punch. You will be left with an 'O' with a scallop edge on the outside. Cut your 'O' into small sections, I usually cut them into groups of 2 scallops. Apply some adhesive onto the back of your die-cut oval and stick your little scallop sections around the edge. I think I used 2 1/2 scalloped 'O' shapes to go around my oval.
Date: Wednesday, December 29, 2010 GMT Views: 1799
Favorited:13
Minglerville Blabber Creative Crew SU Design Team Alumni
Registered: August 14, 2004 Location: Posts: 98098
Sat, Jan 01, 2011 @ 10:42 AM
Oh I love this! I love what you have done with the scallop circle die around the oval. Do you have directions for that?
------------------------------ Debra the Debrameister Nagigator Mingler Gallery My Blog: Yellow and Blue SU Creative Crew Design Team Member-May-August 2011
Registered: April 21, 2004 Location: Clark Fork, ID Posts: 12797
Sat, Jan 01, 2011 @ 2:24 PM
Great card. Love the colors on this card and love the oval shape. But, please tell, how did you do that scallop circle around the oval?!? You may need to add an ETA to your directions...
Thanks for sharing a great topper card.
------------------------------ Susie
Stampin' Up! demonstrator
Growing through challenges