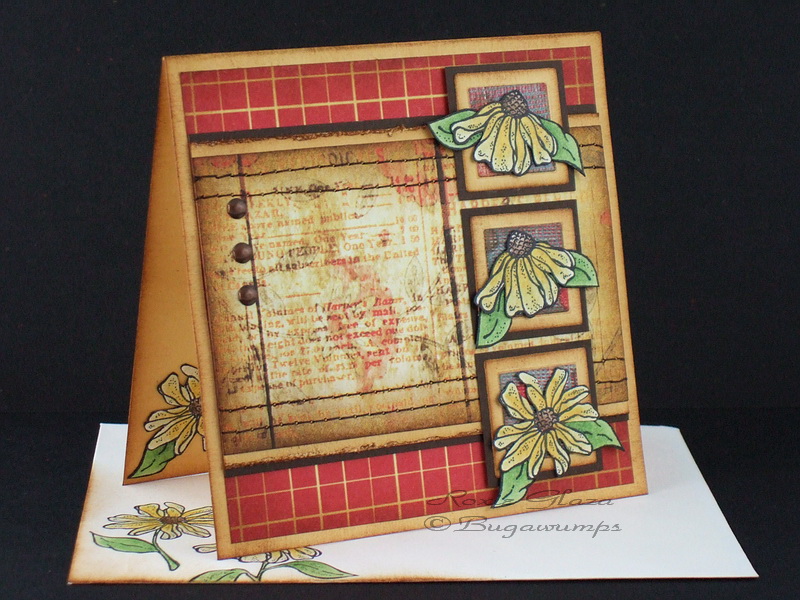
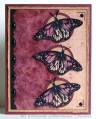
Measurements: The card is 4 ¼” square, red designer paper 4” square, across panel is 2 ½” plus 1/8 and 1/16” borders, smallest square is blue - ¾”, yellow – 1” and brown - 1 3/16”
-I used Nestabilities to cut the two smaller squares and paper cutter to cut the brown square.
-Ink distressing is done on all panels except the brown,
-Machine stitching on the across panelÂ…a little crooked on the top there but hey it adds to the distressed look! The stitches are pulled to the back and tape with regular clear tape.
-Tools distressing on the yellow layer is done with a paper perforator.
-The images are colored with Prismacolor pencils, baby oil and paper stumps. Baby oil replaced Gamsol/mineral spirits.
-The flower are cut out, edged with black marker layered over the cut out leaves and I added some extra cardstock either by punching a ¼” circle of just hand cutting to fill the gap between the leaves so it has a more solid base when I glued it to the card.
Inside: I cut ink distressed all around the card edges and glued the cut out flower on the lower corner.
-Square Card ENVELOPE:
I always use an A2 sized envelope for my square cards so extra postage isn't required. I cut a piece of cardstock 4.25 x 5.5” and to make it easier to pull the card out of the envelope I punch a shape (usually a V/half square or Stampin Up photo corner punch) at the half way point of the top edge as long as embellishments aren’t directly underneath because this cardstock also acts as reinforcement/protection for embellishments as it goes through the sorting machines.
If you donÂ’t have a suitable punch just cut the V with scissors.
Dot some glue about ¼” to 3/8” from each edge and tuck it in the envelope so the glue sticks to the front of the envelope. Then the card tucks in between the envelope front and the cardstock and doesn’t shift around during travel. I will be adding a photo tutorial to my blog and will link it here when I do if you’d like to check back.
If you would rather see this turtorial with photos click on my blog link here.
Date: Tuesday, June 15, 2010 GMT Views: 2693
Favorited:31
Splitcoast Dirty Dozen Alumni Creative Crew SU Design Team Alumni Demo Challenge Leader Splitcoast Challenge Host
Registered: February 8, 2004 Location: South of Oklahoma, North of DFW Airport = North Texas! Posts: 44441
Tue, Jun 15, 2010 @ 8:15 PM
Roxie ... What a beautiful & summery look through your eyes! I'm honored that you chose a card of mine this week ... and truly adore your take on this!
Beautiful card ! - and especially love the tip about using the A2 envelope to save on postage. So many pretty square cards, but ugh on the extra postage a square card requires !!
Registered: March 11, 2008 Location: Sacramento, California Posts: 39766
Tue, Jun 15, 2010 @ 8:48 PM
Rox another great sketch. This card is so beautiful. I love the earthy colors. Wonderful card. TFS :0)
------------------------------ Cathy B aka: Mutnik ....or is it Nutmeg?! I get so confused!
Smile.......people will wonder what you are up to! :0) Proud Fan Club Member 2010 DT forRubbernecker Stamps My Gallery
Registered: April 16, 2010 Location: Southwestern Arizona Posts: 603
Tue, Jun 15, 2010 @ 9:10 PM
Beautiful. . .love how it looks as if it's blooming. Thanks for the mailing tips. Great job on the card!
------------------------------ Jan Marie Ennenga (Craft Hoarders Anonymous Design Team) Recreations4Him For the Lord is great and greatly to be praised. Ps 96:4