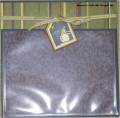
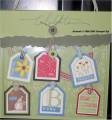
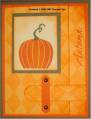
This project is heavily influenced by multiple samples on Splitcoast Stampers. This is another of the projects made in my October "Sassy Stampers" class. We made the 6x6 page protector pouch as a ribbon-handled purse to hold the tags we made from the Terrific Tags Punch Box kit. The Certainly Celery cardstock is 6 1/2 x 8 1/2, scored at 6 1/2 and 6 3/4. The patterned paper is 6x6 and is slipped inside of the page protector (to hide the sticky strip tape). The hemp is merely wrapped (not tied) around the fasteners. The bottom fastener (on the plastic page protector) was positioned using the self-healing mat and awl from the Crafters Tool Kit. 6x6 page protector (cutting off the holes down the side).
Date: Monday, October 10, 2005 GMT Views: 3836
Favorited:144
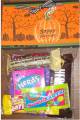
This looks really great! Thanks for the detailed directions. My ladies are going to be making this at our monthly hands-on workshop this Saturday. I was going to have them make it red, but I really like the Certainly Celery. We are also using the Festive Finery to make the cute little purses I have seen here, so this is great, as it will show another use for the papers. I am using the purses as a holder for a Holiday Survival Kit. Thank you so much for sharing. Angie
------------------------------
SU! Demo, DRE, and most rewarding Homeschooling Mom to 4 beautiful children -- Micayla - 14, Alex - 12, Myranda - 10, and Aaron - 6
Registered: August 4, 2004 Location: Coolidge, AZ Posts: 1577
Mon, Oct 10, 2005 @ 1:54 PM
Hi all! I get my 6x6 page protectors thru Close To My Heart, Stampin' Up, and/or my local scrapbook stores. It doesn't matter if the page protectors are for the ring binder type scrapbook or the postbound type scrapbook because the holes are cut off anyway. But if you cannot find 6x6 page protectors, there are also 7x7, 8x8, 9x9, 10x10, and of course 12x12 page protectors available in the industry. You could even use an 8 1/2 x 11 page protector and cut it down to an 8 1/2 x 8 1/2 square. To create the flap and back, I added 1/2 inch to my page protector width (making the cardstock layer 6 1/2 inches wide) and I used a piece of cardstock that was 8 1/2 inches tall. Since my width was 6 1/2 inches, my first scoring line was at 6 1/2 inches tall, then the second scoring line was 1/4 inch above that ( 6 3/4 inches). So...if you were using an 8 x 8 page protector, you could still use a piece of 8 1/2 x 11 piece of cardstock. The width would be the 8 1/2, and then the height would be first scored at 8 1/2 and then at 8 3/4, leaving a 2 1/4 inch flap. And then see how I added another piece of cardstock to the bottom of my flap, you could do the same if needed.
For an 8 1/2 x 11 page protector though, you'll have to use a 12x12 piece of cardstock for the flap and back. The width would be 9 and then the height would be scored at 9 and then at 9 1/4, leaving 2 3/4 inch for a flap.
If you wanted to use a 12x12 page protector, you'd have to use two pieces of 12x12 cardstock. The first piece would be to cover the back side of the page protector. The second piece would be scored at 5 3/4 and then at 6, and then placed overlapping the front and back (the 6 inches would probably be at the back and the 5 3/4 portion as the front flap).
Registered: March 15, 2005 Location: Willow, AK Posts: 716
Mon, Oct 10, 2005 @ 8:31 PM
love it...
i am going to have to give this cute little tag pouch a try...i love the colors...and how clever to use a designer paper to hide the adhesive...
TFS ;)
Registered: January 27, 2005 Location: Posts: 1026
Mon, Oct 10, 2005 @ 10:22 PM
Such a great idea I just love it and your work is wonderful. Thanks so much for providing detailed instructions. I have copied to my favs in hopes of making some of these!!