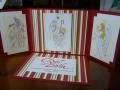
I made this card for my Grandma for Christmas '09. It was a lot of work, but turned out to be a very special card for her. The bottom flap folds up and the 2 sides fold in to form the cover of the card. There is 1 brad on each side with gold stretchy cord holding the card closed. Gorgeous! I used the SU Scrappin' Kit for the paper, and the center stamped image is spritzed with pearl which doesn't show in the picture.
Date: Monday, March 29, 2010 GMT Views: 3591
Favorited:18
Registered: October 5, 2009 Location: Colorado Posts: 4
Tue, Mar 30, 2010 @ 7:48 AM
My goal was to have this fit in a regular envelope so I could mail it! It can be altered to be different sizes depending what size envelope you have. When it's all folded up, it is standard 5.5 x 4 inches. I started with a single 12x12 for the background...
-Trim the starting CS to roughly twice the size of your finished card. I trimmed to 11 1/8" W x 8" tall. You need a tiny bit of extra width because when the card is all folded up the side flaps need to be a bit longer to close over all the layers.
-Score vertically roughly one half the desired width of your finished card from each edge (remember you need the extra width!). I wanted a 5.5" card, so I vertically scored at a generous 2.75" (exactly 2 13/16") from each left and right edge. When the score lines are folded inward after your'e done, they should meet in the middle like french doors
-Score horizontally at exactly the desired height of your card (in the middle of your trimmed sheet). I scored 4" from top/bottom.
-remove lower rectangular sections on left and right sides
To fold the card, the bottom flap folds up first, then the side flaps fold on top of everything else. Due to all the paper, you will need to have some kind of closure to keep the card from popping open by itself. I think this would make a great gift-card holder card for a birthday (with different stamps of course) too.