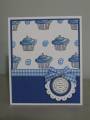
This card came about because I wanted to show my friends how I used the acrylic block and clear imagesÂ…I finished off that panel for a card, prepared by large daisy and remembered I had the daisy in the small image and thought it would work better with the large flower. Used the other panel for another card and did this panel to use with the large daisy and really liked the results!
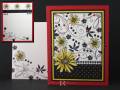
-I started out with solid white cardstock and designed my own designer paper for the background.
Place the flourish images (all from one set so they are all the same height) on the panel as you would like to see them stampedÂ…place the acrylic block over them and press down but before you raise the block, line up the stamp positioner to the block, now left, ink up and stamp and itÂ’s just the way you set it up.
-I then stamped the remainder of the images using the masking technique for a few, stamp positioner for some and just random stamping for others. I made one mistake and covered it with black marker and a red faux brad. See if you can find it!
-My layout layers were what I could find and make work from scraps.
The Houndstooth is a scrap stamped image.
The polka dot is a designer paper scrap. All three pieces were taped together on the back side and treated as one panel when assembling.
-The Faux brads are circles from a tag Cuttlebug die cut that I glue to the card then applied Diamond Glaze on the black for the card base, nothing on the red – the perfect brad every time! Any clear lacquer will work - Diamond Glaze, Crystal Effects etc. I use the CB die cut because it rounds the edges like a real brad. These are very easy to pick up with a straight pin dipped in glue then touch the back of the circle and it’ll pick it up, now place it on the card by pressing down with the finger – it will allow you to move if needed before the glue dries.
-Prismacolor pencils, baby oil and paper stumps were used to color the image using the Gamsol technique found in the resources section here at SCS. Baby oil replaces the Gamsol.
-After cutting out the flower image I went along the edge with a black marker to define the image. This is done from the back side in case the marker slips beyond the intended area which it almost always does!
Tools: Cuttlebug and Tiny Tags die, corsage pin, cutting scissors, stamp positioner, paper stumps
Date: Monday, March 29, 2010 GMT Views: 1052
Favorited:12
Stamps: Hero Arts – daisy flower, unknown small black flower, Inkadinkado – flourishes, Cornish Heritage Farms/CHF – Collage Elements I (Kim Hughes) - solid leaves, three circles, Fine Houndstooth (Scrapblocks)
Paper: White, Stampin Up – Real Red, Summer Sun, Fiskars – black, Paper Flair – polka dot designer paper
Registered: May 6, 2009 Location: Ontario, Canada Posts: 1859
Mon, Mar 29, 2010 @ 1:59 PM
This is fantastic! I love your handmade designer paper -- and they're not mistakes if you can't tell at the end! :P That little strip of houndstooth is a nice touch, too. Thanks also for the advice on using clear stamps for designer paper. Your directions are always so helpful.
------------------------------ Lindsey Please visit my little blog, or my gallery...
Registered: January 6, 2004 Location: Connecticut Posts: 20543
Mon, Mar 29, 2010 @ 2:58 PM
This is so much fun, inside and out! Love the great colors!
------------------------------ Rediscovering the simple joy of stamping and exploring my art! Stamp your ART out! Share your thoughts. Let your heart sing.
Come check out my Gallery and leave a comment!
FS465
Registered: February 26, 2009 Location: Minnesota -- The land of never-ending winter (or so it seems)!! Posts: 734
Mon, Mar 29, 2010 @ 4:22 PM
Beyond beautiful! I love the black and white with accents of red and yellow. Creatively done! Great use of scraps. I would feel honored to received this beautiful card. Oh...and great job on finishing the inside!