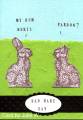
When I first saw the chocolate bunny stamp I remembered a cartoon which various friends emailed to me last year in the run up to Easter. I freely admit to having a warped sense of humour. It makes life more interesting.
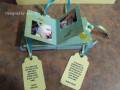
SU supplies: chocolate bunny stamp, choc chip ink, scallop oval punch (for the title frame and for nibbling bits off bunny!), large oval punch, Whisper White cs.
Non SU supplies: blue card, green handmade paper, Karen Foster snap stamps for the titles, reversing stamp, Cuttlebug Swiss Dots embossing folder
Date: Monday, January 18, 2010 GMT Views: 1281
Favorited:13
Thanks to all who have left such encouraging comments (this is the first time I've posted a card online).
To answer the question about how I did the mirror image: I used a (non SU) mirror image stamp, which is just a flat piece of mounted rubber. I have seen the same technique done using the positioning sheet which comes with the stamp-a-ma-jig (but I don't have one of those so can't do it that way).
In detail, I inked up bunny with choc chip classic ink and stamped him onto the flat mirror image stamp. Then I stamped the mirror image stamp onto whisper white. You get a loss of detail at this stage, and I could only get the mirror image to work properly on WW, not even on other colours of SU cs. Then 'huff' on the inked bunny (which is now only half inked) and stamp it on WW. Because both impressions are now the equivalent of what you get when you ink up, stamp off and then use what's left, they come out at about the same intensity.
The mirror bunny sometimes looked a bit rough on the WW but looks a lot better once cut out.
I've had the mirror stamp in my stash for ages, but this is probably the sirst time I've used it properly. It was just right for this card.