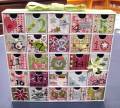
This calendar uses stamps from www.mftstamps.com, including the newest set, Bling 'Bers (the numbers) being released January 6 at 10 pm EST.
For this calendar, all the "components" (months, dates, days of the week) are on magnets, so that you can move them around however you need them. That way, if the 3rd of the month falls on a Monday one month and a Thursday another month, you're all set, and you only have to use one calendar!
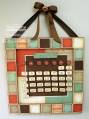
(I don't know why this looks a little crooked in this picture. It must have been the angle that I took the photo at. I swear that it's straight and even in person! ;P)
This calendar is HA-UGE! The frame for it is 24" x 24" and thick wood. VERY heavy.
To make the calendar, I painted the wood frame with brown acrylic paint. I inked the edges of large squares of designer paper and backed them with cream cardstock, to give them a brighter border. I adhered those to the frame with tacky glue. The center section of the frame is sheet metal (galvanized steel) that I cut to size and covered with more decorative paper.
To make the numbers, I stamped the Bling 'Bers numbers on small pieces of decorative paper and attached them to chipboard for some stability. Then I rounded the corners, inked the edges, and sanded them to rough them up a bit. I glued a strong magnet to the back of each one.
For the month names, I did the same thing, this time with Bling 'Bet. I wanted the months to "pop" a little more, so I outlined the inside of each of the Bling holes with a white gel pen. (Yes, that took forever!). In fact, this whole thing took me about 3 days. I don't know why, really... I guess it was just a whole lotta sanding and cutting and inking!
I also made little circle tiles for the days of the week. I used the Alpha Dots set for this. I stamped them on red designer paper, but then they didn't stand out well enough for my liking. So I took a white gel pen and hand drew in a dotted border around the outside of their circles. And then I filled in the letter portion of the image with white gel pen, too.
To finish off the calendar, I attached a wide ribbon and a button-y bow accent. I didn't have any buttons quite as large as I wanted, so I covered a larger chipboard circle with more coordinating designer paper and used that to back my other buttons.
Since the center section is just a piece of galvanized steel, the extra months and dates can just get stuck on the back of the calendar (with their magnets) until I need them. I also wanted to make little tiles for various holidays, but I just plain ran out of time. I'll be adding them soon, and then they can hang out with the "extras" on the back of the calendar, until I need them!
Supplies:
Stamps: Bling 'Bers by MFT, Bling 'Bet by MFT, Alpha Dots, by MFT
Papers: Paper Source Creme Luxe, DP by My Mind's Eye
Inks: Memento Brown, Versamagic Brown, Ranger Distress Antique Linen
Accessories: White Gel Pen, Magnets, Wood Frame, Sheet Metal, Chipboard, Wide Grosgrain Ribbon, Buttons by MFT and Oriental Trading Co.
Registered: April 18, 2009 Location: Boston suburbs, MA Posts: 14060
Wed, Jan 06, 2010 @ 10:31 AM
What a lovely job on this!! It's a very striking calendar, such nicely chosen colors and details. Looks terrific--nice work!!
------------------------------ ~ Emily ~ My BLOG
My kids are on SCS: ponyluvingirl (age 14) and Legoboy (age 10)
I'm a Punchkateer! ~ I design for DeNami Design Rubber Stamps