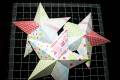
-This is a great way to use up scrap paper of any size. There is no glue involved in the patchwork assembly – Before I die cut I place each strip of paper on one sided sticky paper that is cut to panel size or the large 4 x 5” mailing labels that you can find in the office supply stores works well too and I trim ¼” off the 4” edge before starting my patchwork.
-The patchwork starts by removing the backing and placing the light piece of paper to stamp the sentiment on as a starting point.
-Going in opposite directions start placing strips and change directions as you create. The strips can be any size you wish.
-Line up the patchwork panel on the top note die cut, secure in place with repositional tape and run through the machine. Save the excess for the inside of the card.
-Faux stitch.
-Cut a second die cut panel from a solid color, cut in half and assemble to make a border for the patchwork panel.
-Cut and assemble the snowflake on the round die cut panel and attach to the card.
For the inside:
-On the left: I went to a little extra pains to line up the panel over the top note to get it even so I could use it inside the card with a plain piece of cardstock or paper.
-On the right: I layered the patchwork and a 1/8” strip over the top note and cut; I only did a couple of those you see on the right because I found the one on the left was less work for me and liked the fact that nothing went to waste!
I made ten of these cards using different shades of blue and light colors as the base, it also shows a peek of the envelopes and the variety of ways I decorated them. Some of the card bases were also stamped. The challenge thread link is here.
Tools:
Spellbinder: Nestabilities, Shapeabilities
Stampin Up: mat pack, Sizzix Top Note die cut
Martha Stewart: snowflake punch
Marvy: snowflake punch
Date: Saturday, January 2, 2010 GMT Views: 2168
Favorited:39
Stamps: CHF retired – Let it Snow! Stampin Up – Background Basics -inside sentiment, Star Santa - stars on the right envelope, hand cut star on the left envelope
Paper: Neenah – light blue linen, Stampin Up – Night of Navy, DCWV – glitter cardstock, unknowns – beige and medium blue cardstock, designer paper scraps, sticker paper
Ink: Ranger: Archival – Jet Black, Stampin Up: Classic – Night of Navy, Bashful Blue
Registered: August 24, 2009 Location: Jersey Girl Posts: 3394
Sat, Jan 02, 2010 @ 3:29 PM
What a great idea - and beautiful cards!
------------------------------ Louise Bergmann DuMontAuthor, Speaker, Serious About Her Coffee, Lover of all that is Chocolate...Worshiper of El Shaddai (The All Sufficient One)
Registered: September 3, 2005 Location: not the big city Posts: 5012
Sat, Jan 02, 2010 @ 5:24 PM
they are all so beautiful, how clever
------------------------------ Living in the land of "The Walking Dead"
aka: 25 miles south of Atlanta and 100 Years away 2013 Goals:
Feb - 5 SB pages(6/5)YTD SB Pages: 7
Registered: August 24, 2009 Location: Jersey Girl Posts: 3394
Sun, Jan 03, 2010 @ 5:16 AM
Gave this a try on a few non-Christmas cards yesterday. They turned out great and I used up a ton of really nice DP scraps that I just could not throw out - but didn't know how to use before. Thank you again. Great idea.
------------------------------ Louise Bergmann DuMontAuthor, Speaker, Serious About Her Coffee, Lover of all that is Chocolate...Worshiper of El Shaddai (The All Sufficient One)
Registered: April 24, 2007 Location: Alberta Posts: 6845
Wed, Jan 06, 2010 @ 8:43 AM
Holy Cow -- you are amazing. These cards are SO special and I love the way you made them. Thanks so much for sharing your talent AND sharing your techniques as well!