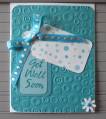
-For the border around the Top Note panel I cut a second piece of cardstock and cut tip to tip both ways. So youÂ’ll actually be making three cuts, #1 line up two tips on your cutterÂ’s edge and cut, #2 and #3 is easy because you now have a straight edge, place the tip on the cutting edge and make your cut.
Now just place under the main panel and secure, I have about a 1/8” gap between the pink layers on each tip. The border won’t be a perfect width all around.
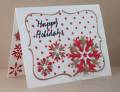
-White snowflakes and stars are a Cuttlebug die cut named Snowflakes #2; pink portion is a Marvy punch. Its glittered paper so Diamond Glaze worked well to assemble them and AleeneÂ’s tacky glue worked fine to attach to the card.
-Tools used, Cuttlebug and Snowflakes #2 die cut Herringbone embossing folder, Shapeabilities, Martha Stewart and Marvy punches, Sizzix Stampin Up exclusive Top Note die cut, ¼” circle punch
Date: Monday, December 7, 2009 GMT Views: 1209
Favorited:16
Registered: July 9, 2008 Location: Stars Fell on Alabama Posts: 74744
Mon, Dec 07, 2009 @ 6:42 PM
Love all those dots and snowflakes. Very pretty!
------------------------------ My Blog---My Gallery---My PinterestI'm a Punchkateer! (Prez) FOREVERDirty Dozen Alumni2014 CAS Spring DT--- Inspiration Challenge Co- Hostess 12/02/17-12/28/19 Watercolor Wednesday Design Team Hebrews 13:2Brenda
Registered: July 18, 2006 Location: Beautiful, British Columbia, Canada Posts: 24229
Mon, Dec 07, 2009 @ 8:28 PM
Great card!! Love the red polka dots.
------------------------------ "For I am confident in this, that He who began a good work in you will complete it until the day of Christ Jesus" Phil 1:6 Verve Diva My Blog My SCS Gallery
Registered: June 29, 2004 Location: Sugar Land. Texas Posts: 79508
Mon, Dec 07, 2009 @ 8:31 PM
Love the textured bg and those wonderful dots.
------------------------------ LizThe joy of the LORD is my strength.Right Brain Madness --My blogProud member of the redDivasKSS certified multi-step stamperFan Club member since 2004